
Where Did That Document Go?
Table of Contents
Lesson 1: Finding documents.......................................................................4
Finding lost documents................................................................................4
Definitions...................................................................................................4
Windows 7 defaults.....................................................................................5
Finding lost documents................................................................................6
Using Windows Explorer..............................................................................6
Parts of the Windows Explorer window (Review).............................................7
Views options in the Contents pane..............................................................8
Finding the My Documents Folder................................................................9
Selecting 1_My Documents folder...............................................................11
Using the Details view of Contents...............................................................12
Using the ‘sort’ buttons (column labels) in Details view..................................13
Applying filters to the sort buttons................................................................14
Filter caution..............................................................................................14
Apply a filter...............................................................................................15
Add a second filter......................................................................................16
Effect of Using Filters..................................................................................17
Clearing filters.............................................................................................17
Using Search..............................................................................................19
See more results.........................................................................................20
Save Your Search Results...........................................................................21
Challenges – Practice what you learned........................................................23
Challenge: Use the Details in the Contents pane............................................23
Challenge: Applying filters............................................................................23
Challenge: Search for documents.................................................................24
Recap of what you have learned today..........................................................24
Lesson 2: File Management.........................................................................24
Objectives..................................................................................................24
File Management........................................................................................25
Starting Windows Explorer...........................................................................25
Windows Explorer review.............................................................................25
My Documents – the default file save location................................................26
Expanding and collapsing folders..................................................................27
Working with Folders...................................................................................29
Create a Folder...........................................................................................29
Creating a second new folder........................................................................31
Renaming Folders........................................................................................31
Working with Files.......................................................................................33
Create a file.................................................................................................33
‘Save’ versus ‘Save as’..................................................................................35
Renaming Files............................................................................................36
Effect of attempting to create duplicate folders or files......................................37
Moving files to a folder...................................................................................39
Right mouse menu to choose Move or Copy....................................................40
Create files for ‘Move or Copy’ examples.........................................................41
Effect of Destination on Drag and Drop Execution............................................42
Which method for Copy or Move?...................................................................43
Use Copy sparingly.......................................................................................43
Deleting objects from the USB flash drive........................................................44
Deleting folders and files from the hard disk.....................................................45
Recovering deleted files and folders.................................................................46
Challenge-Viewing folders in Windows Explorer................................................47
Challenge-Create a folder; work with files.........................................................48
Close all Windows and Exit............................................................................48
Lesson 1: Finding documents
In this lesson you will learn how to use the Details view in Windows Explorer along with the Filters in the Details view and Windows Search to find lost documents.
· Use the Windows Explorer Contents pane (Details view) to help find your documents
· Apply Filters to the Details View fields to refine finding documents in the My Documents folder
· Use Search to extend finding documents to other folders and (if present) additional storage devices
· Save your Search Results
Finding lost documents
Everyone has “lost” a document at some time. You will look at ways to find a lost document; first, by examining My Documents, the default (automatic choice) for saving documents and then by using Search to locate missing documents. This assumes that you successfully saved a document but now you can’t find it.
This section deals only with finding misplaced documents. The next lesson delves into creating folders and using these folders to organize the storage of your documents. Organizing your documents within folders, called File Management, can yield a much lower incidence of “lost” documents.
Definitions
Before we start searching for files we need a few definitions:
· A Document (as the term is used in Windows applications) is a file that is not music or images (pictures or video).
Note: Microsoft also uses “document” to refer to unsaved work. An example is the use of Document1 in the Word title bar as a generic name for the first window you have opened in Word.
· A File is a collection of data in a computer readable format that has been given a name (file name) and stored (saved) to a storage device (hard disk, optical disk or a USB storage device such as a thumb drive or external hard drive). The file name includes a file name extension that is added automatically when the file is saved. More simply, a file is organized information you have given a file name and saved.
· A File Name Extension is the three or four (Office 2007 or newer) letter identifier which is automatically attached to a file that identifies the program that created the file.
File name extension example: filename.docx where docx identifies Word 2007 (or later) as the application that created the file for the use of filename extensions as an essential part of Microsoft’s Document Centric system.
File name extension example: filename.docx where docx identifies Word 2007 (or later) as the application that created the file for the use of filename extensions as an essential part of Microsoft’s Document Centric system.
· A Folder is a “container” for holding files or other folders. Functionally, Computer and Favorites are also folders. The operating system sees folders as a special type of file whose contents is restricted to files and other folders. Windows Explorer 7 includes “virtual” folders such as Libraries or Documents
Note: The term “sub-folder” is a “teaching” convenience for describing folder(s) within other folders. There is no sub-folder defined type.
File name extension example: filename.docx where docx identifies Word 2007 (or later) as the application that created the file.
· A File Manager is a program that is used to assist you in organizing your files in a logical manner using folders. The Windows file manager in Windows 7 is Windows Explorer.
· A Dialog box is a special type of window which opens to allow you to make choices, input information or display messages (frequently warning messages). The Save as dialog box is an example of a dialog box where you choose or enter information while the Delete file dialog box (File Management lesson) is both a warning box and a confirm action box. Dialog boxes typically close after use while windows (such as Windows Explorer) typically stay open.
Windows 7 defaults
Default refers to an automatically selected choice from two or more possible options. Defaults are set during the normal installation of a program. Microsoft Windows 7, for example, automatically creates a default set of folders (storage locations and virtual folders). The primary set of folders in Windows Explorer, which we will refer to as the Windows Explorer system[1] folders (WE system folders), includes Favorites, Libraries, Homegroup, Computer and Network folders. The default location for saving documents is the My Documents folder, which is a folder within the Documents folder under Libraries.
Finding lost documents
There are two common causes for “lost” documents. First, the name the file was saved with is not identical to the name you remember. Second, the document was not saved where you expected (in My Documents, by default). The first step, then, in finding a “lost” document is to look in the default “save” location, My Documents, using Windows Explorer.
Using Windows Explorer
Before you can use Windows Explorer to look for files, you must learn a little bit about Windows Explorer.
1 Click the Windows Explorer icon (Figure 1.1) on the Taskbar at the bottom (default) of the Desktop.
Figure 1.1 Click the Windows Explorer icon to Open Windows Explorer
Clicking the Windows Explorer icon opens the Windows Explorer window (Figure 1.2). The major features of Windows Explorer are labeled. Figure 1.2 shows the five WE system folders in the Navigation (left) Pane and the contents of the Libraries folder in the Contents (right) Pane.
Note: “Windows Explorer” refers to the Windows 7 version of Windows Explorer. Windows Explorer in Windows 7 incorporates major changes from the Windows Vista and the Windows XP versions.

Figure 1.2 Windows Explorer with Major Features Labeled
Parts of the Windows Explorer window (Review)
Figure 1.2 shows Windows Explorer with the major features labeled. Windows Explorer, in Windows 7, has undergone significant changes even from the Windows Vista version. The changes are even more evident to those users transitioning from Windows XP.
· Navigation (left) pane contains only folder (and folder equivalents, such as Favorites or Computer). The Navigation pane never displays user-created files. The small open triangle (w) to the left of each folder icon indicates that the folder is “collapsed” (contains additional folders). In Figure 1.2 the arrow (w) to the left of the Libraries folder has been circled. (The triangles, or arrows, only show when the mouse pointer is in the Navigation pane.) When you “expand” a folder (by clicking on the w) to display its additional folders, the w symbol changes to a filled triangle (y) and the next level of folders is revealed. If a folder has no arrow to its left, that folder contains no additional folders.
Note: The Navigation pane (Figure 1.2) shows the five WE system folders collapsed (folders within these folders hidden). Your computer may have the Libraries folder expanded to show its four standard folders in the Navigation Pane.
Tip: Do not be concerned if the Contents pane on your PC does not look exactly like the image in your manual.
· The Contents pane shows the contents of the folder that has been selected in the Navigation pane. In Figure 1.2 the Libraries folder has been selected, so the Contents pane shows the contents of the Libraries folder. The default view is Tiles.
Tip: Expanding or collapsing a folder in the Navigation pane does not change the display in the Contents pane. The information in the Contents pane changes only when you select a different folder.
· The Libraries pane shows the currently selected library. In Figure 1.2 the Libraries folder is the selected folder. If you have selected a folder (such as File Management within the My Documents folder, the File Management folder name will be displayed below the name of the Library in the Library pane.
· The Address bar displays the Trail to the selected folder. You may move to different locations along the trail by clicking the appropriate folder name. You may move backward or forward along the trail by clicking the Back or Forward buttons to the left of the Address bar. (The buttons are grayed out in Figure 1.2 since the selected folder, Libraries, is a starting point for the trail.)
· The Toolbar contains Organize, New Folder (New Library, if Libraries is selected in the Navigation pane), Views, Preview (toggles Preview pane on or off) and Help, by default. Other options may be displayed, depending on the actions that are available for the selected folder.
Note: While there is a Menu bar that can be displayed, the Menu bar is hidden by default. This default setting is a result of the menu commands no longer being needed. The option is included only for backward compatibility.
· The Details pane (along the bottom of Windows Explorer) contains details about the contents of the selected folder. In Figure 1.2, the Details pane shows that Libraries contains four other folders.
· The Views icon allows you to select the way in which the Contents pane displays information. There are seven Views (choices of how to display) for files and folders in the Windows Explorer 7 Contents pane. These are described below.
Views options in the Contents pane
The drop-down menu from the Views icon (labeled in Figure 1.2) lists the eight formats in which the information can be displayed in the Windows Explorer Contents pane. Tiles, Details and List are the three views that are most frequently used for documents. The Content view (as noted below) is primarily for displaying search results and the four Icons views are designed for use with pictures.
· Tiles view displays an icon with the file name displayed next to the icon. The Tiles is the default view set by Windows 7.
· Details view shows (by default) the file (or folder) Name, the Date modified (date last saved), the Type (application that created the file, or, for pictures, file format) and Size of the file in kilobytes. The Details view is the only view that permits sorting and filtering by Name, Date modified Type or Size.
· List shows a small icon and the file name, with the list arranged in, by default, ascending alphabetical order. The List view is the most convenient for copying, moving or deleting files or folders.
· Content view is used to display more detailed information from a search. Content is the default view resulting from selecting the See more results link in the Search Results dialog box.
· Small Icons shows the maximum number of picture thumbnails per screen. The thumbnails (small representations of the pictures) in this view may be too small to discern picture detail.
Medium, Large and Extra Large icons display picture thumbnails in increasing size (more detail) at the expense of the number of thumbnails displayed. Large Icons is the default setting for picture thumbnails. Extra Large icons show one picture at a time.
Note: Changing a View changes only the manner in which files and folders are displayed in the Contents pane. Selecting a different View has no effect on the actual files or folders.
Finding the My Documents Folder
1 Click the w symbol (circled in Navigation pane, Figure 1.3) to the left of the Libraries folder, if it is not already selected
Your screen should now be similar to Figure 1.3.
Your screen should now be similar to Figure 1.3.

Figure 1.3 Libraries Folder Expanded to Display Next Level of Folders
2 Click the w symbol to the left of the Documents folder, if the Documents folder is not already expanded.
This expands (displays the next level of folders within) the Documents folder so that the My Documents and the Public Documents Folders are displayed (Figure 1.4).
This expands (displays the next level of folders within) the Documents folder so that the My Documents and the Public Documents Folders are displayed (Figure 1.4).
Note that clicking the w symbol (which changes the symbol to a y) to expand the Documents folder did not change the folders visible in the Contents pane.
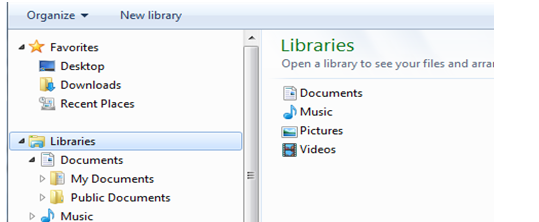
Figure 1.4 Documents Folder Expanded to Display My Documents and Public Documents
3 Double-click the My Documents folder icon (not the w symbol).
Your screen should now be similar to Figure 1.5, with My Documents expanded in the Navigation pane and the contents (folders, if any and files) displayed in the Contents pane.
If My Documents is not expanded in the Navigation pane, double-click My Documents again. Occasionally the double-clicking My Documents does not also expand the My Documents folder in the Navigation pane.

Figure 1.5 Contents of My Documents Displayed in Contents pane
Note: Your screen, at home, may show fewer folders and more files in
My Documents than are shown in Figure 1.5. The My Documents folder, on the classroom computers, contains folders for the files used in each class and do not contain any document files. You will open the 1_My Documents folder, which is within the File Management folder so that we have a large number of files to view in the Windows Explorer Contents pane.
My Documents than are shown in Figure 1.5. The My Documents folder, on the classroom computers, contains folders for the files used in each class and do not contain any document files. You will open the 1_My Documents folder, which is within the File Management folder so that we have a large number of files to view in the Windows Explorer Contents pane.
Selecting 1_My Documents folder
The My Documents folder, in the classroom computers, does not contain files. You will use the 1_My Documents folder (in the File Management folder) for exploring the Details view and applying filters to the Details view.
1. Click the w to the left of the File Management folder in the Navigation pane to expand the folder.
2. Click the 1_My Documents folder (in Navigation pane, Figure 1.6) to select it.
3. Click the down arrow (circled) to the right of Views icon (Figure 1.6) to display the View options for the Contents pane.

Figure 1.6 Displaying the View Options for the Contents Pane
Click Details in the Views options (Figure 1.7).

Figure 1.7 Select ‘Details’ from Views Options
Using the Details view of Contents
The first assumption for finding a lost document is that you saved the document in My Documents, but you are not sure of the exact file name. Step 4, above, changed the view of the Contents (right) pane to Details. The Details view (Figure 1.8) arranges the Contents pane into columns. Windows 7 lets you select which file attributes to display in the Contents pane with the restriction that the Name attribute is required. The three most useful attributes for finding files (and the ones chosen in Figure 1.8) are…
· Name – Name of the file or folder.
· Date Modified – Date and time the file or folder was last saved.
· Type – The name of the application that was used to create the folder. If the file is a picture, Type will show the file format for the picture. Folders are simply identified as folders.
Each of the column titles is also a Sort button. You may sort each column either in ascending (r, A-Z) or descending (s, Z-A) order. In Figure 1.8, the Name button shows the sort order of ascending (circled in the figure).
Note: Windows XP defaults to the file attributes of Name, Size, Type and Date Modified, by default, for the Details view. There is no easy way to change these choices.
Tip: The sort order symbol shows after you click the button. When you change to Details view, the Name button shows its sort order by default.

Figure 1.8 File Management Folder Contents in Details View
Tip: You may need to click the Maximize button on the Title bar of the My Documents window to see all four columns in the Contents pane.
The width of each column is adjustable to make the full content of a column visible or shrink a column to make other columns visible on screen. A column can be adjusted to display all of the longest entry in the column by right-clicking on the sort button and clicking Size Column to Fit in the shortcut menu. You can also AutoFit (automatically fit a column to its longest entry) columns by selecting Size All Columns to Fit from the menu.
1 Click the Type button.
Type shows either the program that was used to create the file or, in the case of pictures, the file format for the picture.
Type shows either the program that was used to create the file or, in the case of pictures, the file format for the picture.
The Type names tend to be long. As a result, the default column with is too narrow to display the full type names. In Windows 7 folders should remain at the top of the list, unlike Windows XP.)
Using the ‘sort’ buttons (column labels) in Details view
1 Click Name (the Name button at the top of the first column in the Contents pane, Figure 1.8). If you do not see files sorted in descending order (Ñ in the Name button), click the Name button a second time.
Tip: The default sort order for Names (Figure 1.8) is ascending (A to Z). Windows Explorer, however, will display the files in the order established by the most recent sort order, even if you have restarted the computer, so your sort order for Names may be in descending order. In addition, when you change Views, the files in the List view will be arranged according to the last sort order in the Details view.
2 Click Date Modified. Look at the sort order for the files and for the folders. If the document you are looking for is one you have been working on recently, sorting with the most recent Date Modified first is a good place to start your search.
3 Click Date Modified again if Date Modified is not sorted in descending (newest date first) order.
4 Right-click on the Type button and then click Size Column to Fit in the shortcut menu.
Applying filters to the sort buttons
1_My Folder contains more than190 items. When you have a folder this cluttered, applying filters can help reduce the clutter. For the three column headings (Name, Date modified and Type) the Filters are:
· Name
o 0-9
o A-H
o I-P
o Q-Z
· Date modified (options depend on how recently you saved files)
o A long time ago
o Earlier this year
o (select date range from calendar)
· Type
o Program that created file
o Picture file formats
o Rich Text Format
o Text File
You may choose multiple filters to apply to the Details view. As you apply filters to additional columns, the number of files that are displayed decrease. If you increase the number of filters within a column, the number of files displayed in the Contents pane will increase.
Filter caution
Make sure you clear all of the filters you have set! The filters will be applied, regardless of the View you have selected!
Note: This list was generated from the 1_My Documents folder. The filters that are listed within other folders will vary, depending on the files in a folder. The list of choices you will be offered depends on the contents of the folder. Date modified and Type filters tend to show the widest variation.
Apply a filter
Click the down arrow (circled in Figure 1.9) to display filter list.

Figure 1.9 Filters for 'Type' Displayed (Partial List)
Not all of the Type filters are shown. This folder contains Rich Text Format files, Text files and TMP (Temporary) files.
Note: Figures 1.9 and 1.10 show only the Contents pane of Windows Explorer.
Click in the box next to JPEG Image to select that file format (Figure 1.10).

Figure 1.10 'JPEG Image' Box Checked
Click the Type button to confirm the JPEG Image filter selection.

Figure 1.11 Result of Applying 'JEPG Image' Filter
Note that a checkmark has replaced the down arrow at the right end of the Type button. The Trail in the Address Box (not shown in Figure 1.11) now reads
⋘ File Management ▶ 1_My Documents ▶ JPEG Image
where the ▶ JPEG Image portion of the Trail indicates the filter that has been set.
where the ▶ JPEG Image portion of the Trail indicates the filter that has been set.
Add a second filter
A list of 120 files may be excessive. You are, however, not limited to a single filter, or, for that matter, a single field.
Point to the Name button and click the down arrow at the right end of the button.
Click in the Checkbox next to A-H (Figure 1.12).

Figure 1.12 'A-H' Filter for 'Name' Selected
Click the Name button to confirm the A-H filter (Figure 1.12).

Figure 1.13 Windows Explorer After Applying Two Filters
Note: Adding a filter from a second column reduces the number of files.
Effect of Using Filters
Applying two filters (Figure 1.13) is reflected in Windows Explorer.
· Number of files in Contents (right) pane is reduced to 19.
· A Checkmark appears at the right end of the Name button and the Type button, as a warning that a filter has been applied to each of these columns.
· The name of each of the filters is added to the end of the Trail in the Address Box.
· A-H appears in the Library pane. (The Name button is the active button, so the filter applied to Name is inserted into the Library pane instead of the current active folder.)
Clearing filters
If you do not wish to try other filter combinations, clicking another folder clears the filters from the 1_My Documents folder. Clicking the Libraries folder, for example, clears all of the filters that were set in 1_My Documents.
If you want to continue experimenting with filters within a folder, you can selectively remove filters.
Click the checkmark at the right end of the Type button (Figure 1.14).

Figure 1.14 Clear 'JPEG Image' Filter from 'Type'
Click checkmark next to JPEP Image to remove it.
Click Type button to confirm clearing the filter.

Figure 1.15 Windows Explorer: 'JPEG Image' Filter Cleared from 'Type'
In Figure 1.15, the JPEG Image filter has been cleared, but the A-H filter still is set in Name. As a result:
· No checkmark in the Type button, confirming that the filter has been cleared.
· A-H is at the right end of the Trail in the Address Box, confirming that filter is still set.
· Checkmark at right end of Name button, confirming that Name still has a filter set.
· The number of items in the Contents pane has increased to 40 (result of JPEG Image cleared), but A-H still set in Name.
Using Search
Are you still unable to find your document? If your document isn’t in My Documents it may have been saved originally in another folder or storage device. When you open a document from another folder and then later save the document, it will be saved back to the folder where it was originally saved. It will not be saved in My Documents. Finding documents that are in folders other than My Documents can best be done with Search.
Note: There is another Search box near the top right corner of the Windows Explorer window. This box searches only the selected folder or location. Since not knowing what folder a document is in is one reason for using Search, searching within the current folder may not find the “missing” file.
You will search for files containing the word brochure.
Click the Start button, to open the Start menu.
Enter b in the Search box (circled in Figure 1.16).
The first character entered in the Search box immediately starts the search.
The first character entered in the Search box immediately starts the search.

Figure 1.16 Search Highlighted in Start Menu and “b” Entered
Note: Your search results pane will show somewhat different results, since the screen shots for the figures were not captured on a classroom computer.
Notice that Search include objects from the Control Panel as well as documents. The search results are categorized according to type. The number in parentheses after the category name indicates the number of files that contained the search character.
Note: Search does not search the Program Files, User Accounts or Windows folders.
Type an r after the b in the search box.
Using br drastically narrows the number of results. Compare the number in parentheses after Documents in Figure 1.16 with the results in the previous figure (Figure 1.17).
Using br drastically narrows the number of results. Compare the number in parentheses after Documents in Figure 1.16 with the results in the previous figure (Figure 1.17).

Figure 1.17 Search Term Expanded to “br”
Add oc after the br (broc should be in the Search box).
On the computer used to create these figures, the search term broc limited the results to the Word documents containing brochure in the file name.
On the computer used to create these figures, the search term broc limited the results to the Word documents containing brochure in the file name.
Note: You do not need a complete file name for Search. Any file name that contains the sequence of letters you entered in the name box will be included in the search results. You could have, for example, stopped the Search after entering the br, if you felt that this search result was adequate for your needs.
See more results
The See more results option displays the search results using the Contents view.
Click the See more results link just above the Search box (next to the magnifying glass icon).
Clicking See more results displays your current search results in a Contents view as shown in Figure 1.18.
Clicking See more results displays your current search results in a Contents view as shown in Figure 1.18.

Save Your Search Results
You can save your Search results for future reference.
1 Click Save Search (Figure 1.18).
Clicking Save Search opens a Save as dialog box (Figure 1.19). The default save location is in C:\users\Senior\Searches\broc. The default file name for your search is the search character string (broc) with a file name extension of search-ms as shown below.
broc.search-ms – (default file name for broc search)


Figure 1.19 'Save as' Dialog Box; Saving 'broc' Search
Click the Save button to save the search results using the defaults.
A link to the folder containing the search results will be added under the Favorites folder (list) in Windows Explorer (Figure 1.20). Do not confuse this folder with Favorites in Internet Explorer. They are completely different.
Click the w to the left of the Favorites star at the top of Navigation pane.
(Do not click on the Favorites icon.)

Figure 1.20 Link to Folder Containing 'broc' Search Results
This will display the link to the search results (Figure 1.20).
Click the y next to Favorites to collapse the Favorites list.
Click the Close button on the Search Results Title bar to close the Search Results window.
Clicking the Search Results Close button will reveal Windows Explorer.
Clicking the Search Results Close button will reveal Windows Explorer.
Note: Search results are saved to a folder created in C:\users\Senior\Searches\ (assuming that the C: drive is the primary hard disk for Windows 7). Changing the Save as location in the Save Search"Save as dialog box changes only the location of the link to the folder containing the search result, not the location of the search result.
Challenges – Practice what you learned
The following Challenges give you an opportunity to practice what you have just covered while you have access to the coaches and the instructor.
Challenge: Use the Details in the Contents pane
Make the File Management folder the active folder.
Change the view in the Contents pane to Details.
Sort the Date modified so that the most recent file is at the top.
Sort by Type.
Reverse the Type sort order.
Challenge: Applying filters
Size all of the columns to fit the longest entry in each column.
Tip: Right-click on any sort button and use the menu.
Apply a filter to Type so that only the Microsoft Office Word Documents are displayed.
Apply a second filter to Type so that the Microsoft Office Excel Documents are also displayed with the Microsoft Office Word Documents.
Tip: After Step 3 you will have two boxes checked in the Type drop-down filter list.
Clear all of the filters.
Challenge: Search for documents
Search for documents that contain toy.
Display the search results using See more results.
Save the search results.
Recap of what you have learned today
In this lesson you have learned to
· Use the Windows Explorer Contents pane (Details view) to help you find your documents
· Use the Views list (drop down list from Views icon) to change the display in the Contents pane
· Use the sort feature of the Details view in the Windows Explorer Contents pane to sort files by Name, Date modified and Type
· Apply one or more Filters to the sort columns to refine your display of files
· Use Search to extend finding documents to other folders and (if present) additional storage devices
[1] These folders are not, in the technical sense, system folders. The true Windows system folders are Program Files, User Accounts and Windows
Lesson 2: File Management
This lesson is an introduction to File Management; including creating and naming folders and copying, moving, deleting and recovering files and folders deleted from hard disks or removable storage.
Objectives
· Expand and Collapse the Windows Explorer folder hierarchy
· Create folders and rename a folder
· Create a file, save the file to a specific folder and rename the file
· Copy and move files and folders
· Copy or move groups of files
· Learn right-click commands and how to identify default (left-click) commands
· Delete files and folders and restore them from the Recycle Bin
File Management
Creating folders and collecting related documents within folders is a proven technique for keeping track of documents. It can also reduce the chances of “losing” a document. The term used to describe this process of creating folders and grouping related documents in these folders is File Management.
Think of a folder as a kitchen cabinet. One cabinet might store food, while another stores dishes. One cabinet stores flatware, another stores glassware, and a third stores glass cookware. In Windows, one folder might store documents you create (such as a memo in Word or a workbook in Excel), while another might store pictures you download from the Internet.
You might, additionally, further divide your kitchen cabinets: a shelf for glassware, another for coffee cups, and so on. If you have lots of glasses, you might divide the shelves, perhaps water goblets on the left and brandy snifters on the right. Similarly, in Windows you can have folders within folders to provide additional levels of organization.
You do not need to predict all of the folders you may eventually need. Just create additional folders as you see possible advantages in grouping files about a particular topic or purpose. The “logic” of naming folders and the choice of which documents to collect into the named folder is up to you. It is “logical” only if the arrangement of documents within folders makes sense to you.
Starting Windows Explorer
To review, The Windows Explorer icon is pinned to the Taskbar.
Click the Windows Explorer icon (Figure 2.1).

Figure 2.1 Windows Explorer Icon on Taskbar
Windows Explorer review
Figure 2.2 reproduces (from Lesson 1) the labeled Windows Explorer window for your review.

Figure 2.2 Labeled Windows Explorer Window
· The Navigation (left) pane contains the folder hierarchy. In Figure 2.2 the folder hierarchy is fully collapsed, with only the Favorites, Libraries, Homegroup, Computer and Network folders (or folder equivalents) displayed in the pane. Each folder has an Expand Folder symbol (w, circled next to Libraries) to its left. Remember the Navigation pane never displays user documents.
· The Contents (right) pane displays the contents (files and folders) of the active (selected) folder. In Figure 2.2 Libraries is the selected folder.
· The Toolbar contains, at a minimum, Organize, the New [library or folder] command, the Views selection icon and the Help icon. Other options may appear on the Toolbar.
Note: The New [library or folder] notation is used to indicate that the command may be either New Library or New Folder, depending on whether a library icon or a folder is selected in the Navigation pane.
· The Address bar (above the Toolbar) contains the Trail (sequence of folders traversed) to the folder selected in the Navigation pane.
My Documents – the default file save location
The default location for saving documents is the My Documents folder. The trail to My Documents is Libraries "Documents " My Documents. To display the My Documents folder in Windows Explorer, you must expand the Libraries folder and the Documents folder.
Tip: The classroom computers do not have files stored in the My Documents folder. Instead, folders have been created for each of the Troy Senior Computer Learning Center (TSCLC) classes within My Documents. The files used in each class are stored in the appropriate folder.
Note: The notation form Libraries "Documents " My Documents means click the Libraries folder, then click the Documents folder and then click the My Documents folder.
Tip: You can expand the Libraries and document folders, without selecting them, to display My Documents in the Navigation pane (see Expanding and collapsing folders, next section).
Expanding and collapsing folders
The folders in Navigation pane are part of a hierarchy (folders within folders). Expanding and collapsing the hierarchy changes the display of folders in the Navigation pane and is implemented with the symbols to the left of folders. “Collapsed” folders (such as the Libraries folder) have an open triangle (w, also called an arrow) to their right. Expanded folders have a filled triangle (y, also called an arrow) to their left. Expanding or collapsing the folders displayed in the Navigation pane does not affect the information in the Contents pane.
The Navigation pane from Windows Explorer is shown in Figure 2.3. In this example, the Libraries folder (Figure 2.3) has been expanded (y symbol circled to the left of the folder). The Libraries folder contains the Documents, Music, Pictures and Videos folders. The w symbol (as circled to the left of the Documents folder) indicates that these folders contain additional folders that are not visible. Clicking the w symbol expands the adjacent folder and changes the symbol to y (revealing the previously “hidden” layer of folders).
Note, on your screen, that the Contents (right) pane shows the Documents, Music, Pictures and Videos folders. Figure 2.3, below, does not show the Contents pane so that the symbols to the left of Libraries and Documents can be made more easily visible in this manual.
1 Click the w symbol to the left of Documents (Figure 2.3).

Figure 2.3 'Libraries’ Folder Expanded; Remaining Folders Collapsed (Navigation Pane)
Clicking the w symbol expands the Documents folder (Figure 2.4) and reveals the My Documents and the Public Documents folders.

Figure 2.4 'Documents' Folder Expanded
Note that clicking the w symbol did not change the display in the Contents pane. Expanding or collapsing the folder hierarchy does not change the Contents pane.
2 Double-click the My Documents folder icon (Figure 2.5).
Double-clicking the icon first selects the My Documents folder and then expands it. When you select a folder, making it the active folder, the contents of that folder are displayed in the Contents pane. (A single click in the Navigation pane selects the folder, displaying its contents in the Contents pane, but does not expand the folder in the Navigation pane.)
Double-clicking the icon first selects the My Documents folder and then expands it. When you select a folder, making it the active folder, the contents of that folder are displayed in the Contents pane. (A single click in the Navigation pane selects the folder, displaying its contents in the Contents pane, but does not expand the folder in the Navigation pane.)

Note: My Documents is the selected folder and is listed in the Library pane under Documents library. (The Documents folder is a library folder.)
Summary: Expanding or collapsing the folders display does not change the Contents pane. The Contents pane only changes when you select a different folder (click the folder). Double-clicking a folder in the Navigation (left) pane both expands the folder in the pane and selects the folder to display its contents in the right pane.
Working with Folders
In this section you will create new folders and name or rename folders.
1 Click the Views icon (Figure 2.6) and click List from the drop-down menu.

Figure 2.6 Click Down Arrow at Right of 'Views' Icon to Show Options
The List view is the most convenient for creating and moving folders and for deleting files and folders.
Note: The other views are Tiles (Windows default), and Details, for documents. There are also four Icons views (small, medium, large and extra large) for viewing picture thumbnails and the Contents view, which is used primarily to view search results (see Lesson 1).
Create a Folder
There will be many occasions when you will want to create a folder. In most cases, at home, you will want to create folders in My Documents to aid in organizing files so you can find then more easily. These folders should have names that are meaningful to you and should reflect the contents of the files in the folder.
1 Click the File Management folder in the Navigation pane to select it, as shown in Figure 2.7.
2 Click New folder (circled in Figure 2.7) on the Toolbar.

Figure 2.7 Click 'New Folder' on Toolbar ('File Management' Folder Selected)
The new folder is added to the Contents pane with the temp name New folder (Figure 2.8). The temp name is automatically selected for replacement.

Figure 2.8 New Folder Created and 'New Folder' Name Selected
Key Point: When you click New folder, the folder is created with a temporary name of New folder. Immediately type the folder name you wish to use. New folder is already selected, so the folder name you type will automatically replace New folder.
Note: Folders are required to have a name. Windows inserts New folder to meet the “must have a name’ requirement, but also automatically puts the name into “rename” mode.
Type Brochures as the new folder name (Figure 2.9).
Click outside the new folder name to unselect it.

Tip: If you have clicked in any other location before starting to type Brochures, the New folder temporary name will no longer be selected. If that is the case, right-click on the New folder name, then click (left-click) the rename option. Enter Brochures in the rename box as the new folder name. Click outside the box to confirm the name.
Creating a second new folder
Click New folder in the Toolbar (See Figure 2.7).
Enter My Letters as the name for the new folder, replacing the New folder temporary folder name. Click outside the rename box to confirm the name.
You should now have two new subfolders in the File Management folder (Brochures and My Letters) that you can use to store brochures and letters.
You should now have two new subfolders in the File Management folder (Brochures and My Letters) that you can use to store brochures and letters.
Renaming Folders
Within Windows Explorer you can select the folder to be renamed either in the Folders pane or the Contents pane.
1 Click the My Letters folder (in Contents pane) to select it (Figure 2.10) and then click Organize to open menu.

Figure 2.10 Select ‘My Letters’; Click ‘Organize’ to display Menu
Tip: Alternatively, right-click My Letters and select (left-click) Rename from the shortcut menu. Appendix B contains a summary of right-click command options.
2 Click Rename in Organize drop-down menu.

Figure 2.11 Click ‘Rename’ in 'Organize' Menu
Clicking Rename will select My Letters for renaming (Figure 2.12).
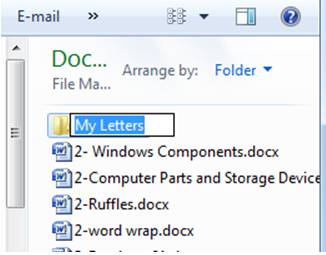
Figure 2.12 'My Letters' Selected for Renaming
3 Type in Our Letters and click outside the box to confirm the entry.
You should now have two subfolders in the File Management Folder; the Brochures folder and the Our Letters folder, which can be used to store brochures and letters, respectively.
Working with Files
In this section you will create and name a file (in WordPad) to give you a new small file to work with. A version of WordPad is included in all versions of Windows.
Note: Since you probably will not have WordPad as a shortcut on your home PC, we will start WordPad from the Accessories folder in the Start menu.
Create a file
Click the Start button. This opens the Start menu (Figure 2.13).
Point to All Programs near the bottom of the left pane of the Start menu (circled, Figure 2.13).

Click the Accessories folder (Figure 2.14).
You may need to scroll down (use scroll box to right of All Programs list) to find the Accessories folder.
You may need to scroll down (use scroll box to right of All Programs list) to find the Accessories folder.

Click WordPad (circled in Figure 2.14 in the Accessories folder to open the program.
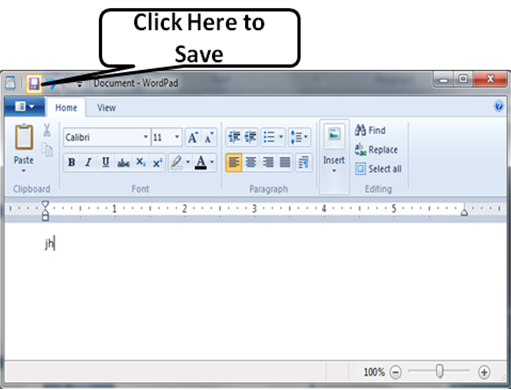
Type your initials into the WordPad window.
Click the Save icon (Figure 2.15) in the WordPad Quick Access Toolbar.
Note: The version of WordPad used in the classroom is the Windows 7 version that uses a Tab and Ribbon user interface based on Office 2010. If you are using WordPad from an earlier version of Windows (Windows XP and Vista), WordPad will have the older Menu and Toolbars user interface.
Since the document is a new file, clicking the Save icon automatically opens the Save as dialog box (Figure 2.16 next page).
‘Save’ versus ‘Save as’
The Save command assumes an existing file name for the document. If the document has a file name, Save replaces the existing version of the file (stored file) with the current document. (There is no warning dialog box telling you that you are replacing the existing version of the file with the current document.)
If the document is new, Save cannot find an existing file name. Since there is no existing file name, Windows automatically opens a Save as dialog box. When the Save as dialog box opens you are expected to enter the file name you want to use for your new document. In anticipation of you entering your file name for your document, the temporary file name in the File name box is already in rename mode. Clicking the Save icon automatically opens the Save as dialog box
(Figure 2.16).
(Figure 2.16).
Tip: There are symbols you cannot use in file names and there are also specific names you cannot use. See Appendix B for details.
Type Name in the File name: box (#1, Figure 2.16) to replace document.rtf.
Do not click the Save button. You want to save this file in the File Management folder not in My Documents!
Do not click the Save button. You want to save this file in the File Management folder not in My Documents!

Figure 2.16 Type 'Name' in the 'File name' Box
Double-click File Management in the Contents pane
(#2, Figure 2.16). This will make the File Management folder the Save as location for Name.
(#2, Figure 2.16). This will make the File Management folder the Save as location for Name.
Click the Save button (#3, Figure 2.16) to save the document to the File Management folder with the file name of Name.rft.
Close the WordPad window by clicking the Close button (X) at the right end of the Title Bar.
You should see a new file named Name.rtf in the File Management folder.
Note: When the Save as dialog box opens, My Documents is the “Save to” location even though you have not selected that folder. (Note that My Documents is listed below the Documents library in the Library pane, which identifies My Documents as the active folder). The Documents folder (circled in the Navigation pane, Figure 2.16) is a Library folder and does not contain files.
Renaming Files
The same procedure for renaming folders (see page 2.12-2.13) is also used to rename files.
1 Click the File Management folder in the Windows Explorer Navigation pane, if it is not already selected.
2 Click Name.rtf in the Contents pane, and click Organize in the Toolbar to display the drop-down menu.
3 Click Rename in the drop-down menu.
Name.rtf is automatically selected to be replaced by the new file name.
Name.rtf is automatically selected to be replaced by the new file name.
4 Type My Name and click outside My Name to confirm the new file name.
Tip Windows 7 does not require you to type file name extensions when renaming files. In Windows XP, however, if the original file extension is visible you must enter it just as it was originally shown in the file name. This is one instance where you must type the .rtf file name extension. If extensions for known file types are hidden (the file extension is not shown) you do not have to enter the file name extension.
Effect of attempting to create duplicate folders or files
The Windows operating system will prevent making a duplicate of a file or a folder in the same location as the original. You will use the Our Letters folder to demonstrate the result of attempting to create duplicate folder names.
1 Click the Our Letters folder within File Management.
2 Click Organize (Toolbar) and then click Copy in the drop-down menu (Figure 2.17).

3 Click Organize and then click Paste (Figure 2.18).
Summary: Clicking Paste (in the Organize menu) attempts to create a duplicate of the Our Letters folder. Windows (and all other operating systems) does not permit creating folders (or files) of the same name in the same location. Therefore, Windows pastes the “duplicate” folder with Copy added to the folder name (Figure 2.19, ‘Our Letters – Copy’ circled).

Hold down the Ctrl (Control) key, press and release the V key, and then release the Ctrl key.
.
The Ctrl + V shortcut key combination (see Shortcut Key Combinations in Appendix B or the handout) performs a second Paste operation. This folder is named Our Letters – Copy (2). Since these seven keyboard shortcuts are available in any Windows program, the shortcuts are more frequently used than the commands from the Ribbon. You could have used Ctrl + C to do the Copy (Step 2) instead of the Copy command from the Organize menu.
The Ctrl + V shortcut key combination (see Shortcut Key Combinations in Appendix B or the handout) performs a second Paste operation. This folder is named Our Letters – Copy (2). Since these seven keyboard shortcuts are available in any Windows program, the shortcuts are more frequently used than the commands from the Ribbon. You could have used Ctrl + C to do the Copy (Step 2) instead of the Copy command from the Organize menu.
Note: An object placed on the Clipboard (special area of memory set aside for storing Copy or Cut objects) stays on the clipboard until it is replaced by another object. If the Clipboard is opened (click the Clipboard Launcher arrow, bottom right corner of Clipboard Group in the Home ribbon), you may have as many as twenty-four items on the Clipboard, arranged from newest (at top of list) to oldest. When you exceed 24 items, the oldest item (bottom of the list) is deleted from the Clipboard to make room for the new object.
Moving files to a folder
File management involves creating a folder (or folders) for a group of files about a topic and moving files to that folder. You may move individual files, selected non-contiguous files or a group of contiguous files.
Point to 3-Brochure01.doc, hold down the left mouse button, drag the file to the Brochures folder, and release the mouse button.
Note: The operation in the step above is frequently called “drag-n-drop”. Another method is to right-click on 3-Brochure01.doc and click (left-click) Cut in the shortcut menu. Then right-click the Brochures folder and click (left-click) Paste in the shortcut menu. This method is particularly useful if you have difficulty doing the drag-n-drop operation.
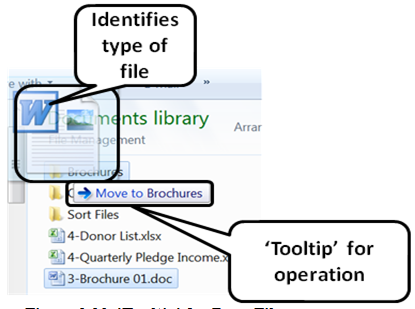
You will see a Tooltip (Figure 2.20) when the mouse pointer is on the destination (Brochures) folder. The Tooltip includes a semi-transparent icon, which identifies the type of file (or files) and a message, preceded by a " sign, describing the operation. The " sign (which appears in the Tooltip for a Move) indicates that the pointer is on an acceptable (a folder, in this case) destination. When you release the left mouse button, the Tooltip will disappear and the file, in this case, is moved to the Brochures folder.
Note: The Tooltip for a “Drag-n-Drop” Move uses the arrow, as shown in Figure 2.20. If the “Drag-n-Drop” operation is a Copy, the symbol will be a + followed by Copy to.
Click the 3-Brochure02.doc file icon. Hold down the Ctrl key. While holding down the Ctrl key, click the 3-Brochure10.doc file icon.
Using the Ctrl (Control) key lets you select non-contiguous (non- adjacent) files (Figure 2.21).
Point to any one of the selected icons, hold down the left mouse button, drag the files to the Brochures folder, and release the mouse button.
The Tooltip for this operation includes a “2” (circled in
Figure 2.21). The number indicates the number of files that are included in this operation. This “number of files” information is new with Windows 7.
The Tooltip for this operation includes a “2” (circled in
Figure 2.21). The number indicates the number of files that are included in this operation. This “number of files” information is new with Windows 7.

Click 3-Brochure 04.doc. While holding down the Shift key on your keyboard, click (left mouse button) 3-Brochure 08.doc. Release the Shift key.
This selects the remaining adjacent “3-Brochure” files.
This selects the remaining adjacent “3-Brochure” files.
Point to one of the 3-Brochure icons, hold down the left mouse button and drag the three files to the Brochures folder. Release the mouse button when the pointer is on the Brochures folder icon.
You can select files (or folders) as an individual file (page 2.13), as scattered (non-adjacent) files by using the Ctrl (Control) key
(page 2.22, or by using the Shift key to select a group of adjacent files (pages 2.22-2.23). If you have created a new folder to hold some group of files, you will probably use the Ctrl key or the Shift key procedure to move a group of files.
(page 2.22, or by using the Shift key to select a group of adjacent files (pages 2.22-2.23). If you have created a new folder to hold some group of files, you will probably use the Ctrl key or the Shift key procedure to move a group of files.
Tip: You can combine the Shift and Ctrl key methods by first selecting the adjacent files (Shift key) and then selecting the remaining non-adjacent files by holding down the Ctrl key and clicking on the scattered files.
Right mouse menu to choose Move or Copy
You used the left mouse button to drag the selected 3-Brochure files to the Brochure folder. Using the left mouse button to drag files executes the default choice (either Move here or Copy here). While you could memorize the rules that determine whether the left drag will result in a Move or a Copy (Appendix B), there is an easier way; use the right mouse button. When you use the right mouse button to drag files you can choose whether the action will be a Move or a Copy.
Create files for ‘Move or Copy’ examples
Click the Practice File to be Deleted.docx file in the File Management folder.
Click Organize in the Toolbar and click Copy in the drop-down menu.
Click Organize and then click Paste in the drop-down menu.
Repeat step 3 (click Organize and Paste) to create another copy of the file.
Tip: You also use Ctrl+V shortcut for paste.
Tip: You also use Ctrl+V shortcut for paste.
You should now have Practice File to be Deleted.docx,
Practice File to be Deleted-Copy.docx and
Practice File to be Deleted –Copy (2).docx in the File Management folder, in addition to the copies of the Our Letters folder.
Plug the USB thumb (flash) drive that you have been given into one of the USB ports on the left side of your monitor.
Click the Close button (Figure 2.22) on the Title bar of the AutoPlay dialog box if the dialog box (Figure 2.22) appears after inserting the USB Thumb drive.
Note: You may not see an AutoPlay dialog box on some computers running Windows 7. Windows 7 can be configured to suppress AutoPlay as a security measure.

Effect of Destination on Drag and Drop Execution
Point to Practice File to be Deleted-Copy (2).docx in the
File Management folder, hold down the left mouse button, and drag the file to TroyCLiC (E:) under Computer. Note that the Tooltip reads Copy when the pointer is on the TroyCLiC (E:) icon. Release the left mouse button.
File Management folder, hold down the left mouse button, and drag the file to TroyCLiC (E:) under Computer. Note that the Tooltip reads Copy when the pointer is on the TroyCLiC (E:) icon. Release the left mouse button.
Note: As mentioned earlier, this is operation is frequently called “Drag-n-Drop”.
Point to File to be Deleted–Copy (2).docx in the File Management folder, hold down the left mouse button and drag the file to the My Documents Folder. (Note that the Tooltip reads Move when the pointer is on the My Documents icon.) Release the left mouse button.
Point to Practice File to be Deleted.docx in the File Management folder, hold down the right mouse button and drag the file to the My Documents folder. Release the right mouse button. Click (left-click) Copy here in the shortcut menu (Figure 2.23).

Note that Copy here is in bold. The option shown in bold, in shortcut menus, is the default action when you use the left mouse button.
Using the left mouse button for Drag-n-Drop executes the default operation, either a Move here or a Copy here. In Step 1, the default operation was a Copy.
In Step 2, the default operation was a Move.
In Step 2, the default operation was a Move.
How do you know if the default is going to be a Copy or a Move? How the default operation is determined is explained in the “Copy here, Move here and User Accounts”. The safest method is to use the right-drag option, as in Step 3.
Right-drag allows you to explicitly choose whether to do a Copy here or a Move here.
Right-drag allows you to explicitly choose whether to do a Copy here or a Move here.
Which method for Copy or Move?
You have used two methods for copying folders or files; left-drag and right-drag. Drag-n-Drop (left mouse button) involves the fewest operations. If you are certain of the default (left button automatic choice), this is the quickest method, but it may not be the safest method
Right-drag and drop (right mouse button) involves one more step than (left) drag, but you can choose specifically which action you want. Note that Move here only appears in the right mouse button shortcut menu.
In addition, you could also use the shortcut menus from right-click Copy and right-click Paste. This involves more steps, but you do not need to hold down a mouse button and drag with the mouse. This is often the preferred choice if holding down a mouse button while dragging is difficult. Using the Edit Menu commands is a slow but more sure method.
Tip: The same methods can also be used for a move. Note that the Move here command is seen only in the right-click (or right-drag) shortcut menu.
Note: If you have difficulty using the mouse “drag” operations, you may use ClickLock. (The instructions for initializing ClickLock are in Appendix B.)
Use Copy sparingly
The Copy command, with folders and files, is best used only for creating backups. Indiscriminate copying can create multiple versions of files in various paths or on various storage devices. It can become difficult, when you have several versions of a file, to identify which file is actually the current version. The Date modified property is not a reliable indicator of the current version of a file since this property changes when you open a version to view the file’s contents. If you feel you must create an additional copy of a file, consider resaving the file using the Save as command and add the date the copy was made to the file name.
When you delete a file or folder from the hard disk, it goes into a Recycle Bin. This allows you to restore or undelete the file or folder at any time until you empty the Recycle Bin. When you delete a file or folder from a removable storage device such as a flash drive, CD, or floppy disk, the deletion is permanent and the file or folder cannot be retrieved within Windows. (Very skilled technicians may be able to retrieve deleted data using third-party programs.)
Right-click the Recycle Bin on the Desktop.
If the Recycle Bin is not visible, Minimize Windows Explorer by clicking the Minimize button on the Windows Explorer Title bar.
Click (left-click) Empty Recycle Bin (Figure 2.24) in the shortcut menu.

Tip: The purpose of the “Empty the Recycle Bin” step is to reduce the clutter in the Bin so you can more easily identify the folders and files you have deleted.
Click Yes in the Confirm Delete dialog box (Figure 2.25).

Deleting objects from the USB flash drive
Click the TroyCLiC (E:) icon, under Computer, in the Navigation pane.
.
This displays the files on the USB flash drive in the Windows Explorer Contents pane.
.
This displays the files on the USB flash drive in the Windows Explorer Contents pane.
Click Practice File to be Deleted –Copy (2).docx and press the Delete key on your keyboard.
Note the wording of the first line in the Delete File dialog box (Figure 2.26).
Click the Yes button (Figure 2.26) in the Delete File dialog box .

Click the Our Letters – Copy (2) folder and press the Delete key on your keyboard.
Note the wording of the first line (circled) in the Delete Folder dialog box (Figure 2.27).

Click the Yes button in the Delete Folder dialog box to confirm the deletion.
Deleting folders and files from the hard disk
1 Click the Windows Explorer icon (on the Taskbar) if Windows Explorer is not open.
2 Click the File Management folder (under My Documents) if the File Management folder is not selected. (The contents of the File Management folder should be visible in the Contents pane of Windows Explorer.)
3 Click Practice File to be Deleted.docx in the Contents pane to select the file.
4 Press the Delete key on your keyboard.
Note the first line (circled) in the Delete File dialog box
(Figure 2.28). The warning message when you delete a file (or a folder) from the hard disk is not the same as the warning message (Figure 2.27) when you delete a file (or folder) from a flash drive.
(Figure 2.28). The warning message when you delete a file (or a folder) from the hard disk is not the same as the warning message (Figure 2.27) when you delete a file (or folder) from a flash drive.

Click Yes in the Delete File dialog box.
Click the Our Letters – Copy folder and press the Delete key on your keyboard. Click Yes in the Delete Folder dialog box.
Recovering deleted files and folders
Minimize Windows Explorer (click on the Minimize button in the Windows Explorer Title bar) if the Recycle Bin is not visible.
Double-click on the Recycle Bin to open it.
As you might have expected from the warning messages in the Delete dialog boxes, the Practice File to be Deleted -Copy.docx file and the Our Letters – Copy (2) folder are not in your Recycle Bin. The Windows operating system does not keep track of files or folders deleted from flash memory drives!
Double-click Practice File to be Deleted.docx.
This opens the Practice File to be Deleted Properties dialog box.
(Figure 2.29, next page).
(Figure 2.29, next page).

Click Restore and then click OK.
Clicking Restore restores the file to its original location. After restoring the file, you must click OK to close the Properties box.
Right-click on the Our Letters – Copy folder.
Right-clicking on the folder opens a shortcut menu. Notice that the default choice (in bold face) opens the Properties dialog box.
Right-clicking on the folder opens a shortcut menu. Notice that the default choice (in bold face) opens the Properties dialog box.
Click (left-click) Delete in shortcut menu.
The shortcut menu allows you to remove individual folders or files from the Recycle Bin without removing everything from the Bin.
The shortcut menu allows you to remove individual folders or files from the Recycle Bin without removing everything from the Bin.
Challenge-Viewing folders in Windows Explorer
Start Windows Explorer by clicking the Windows Explorer icon on the Taskbar.
Collapse the Libraries folder (and any other expanded folders in the Navigation pane, such as Computer or Favorites). You should see only the five system folders (Favorites, Libraries, Homegroup, Computer and Network) in the Navigation pane.
Click the Libraries folder icon to select Libraries. (The contents of the Libraries folder should be visible in the Contents pane.)
Expand Libraries. (Click the w sign to the left of the Libraries icon) so all the storage devices are shown in the Folders pane.
Does the Contents pane change?
Expand the Documents folder. (Click the w sign to the left of the Documents folder.)
What is displayed in the Contents pane?
What is displayed in the Contents pane?
Tip: The Contents pane should not have changed from displaying the contents of Libraries.
Challenge-Create a folder; work with files
Create a new folder in the File Management folder.
Name the new folder My Folder.
Copy all the files from the Brochures folder to My Folder.
Tip: Double-click Brochures in the Contents pane. Select the files and use right-drag to copy the files to My Folder in the Folders pane.
Rename 3-Brochure 04.doc, located in the Brochures folder, to Contoso Brochure.
(Use the same procedure as described in the Tip on page 2.9)
(Use the same procedure as described in the Tip on page 2.9)
Move My Folder to the USB thumb drive (Drive E:).
Delete the Brochures folder. (Did you need to confirm the file deletes?)
Delete My Folder from the USB drive.
Restore the Brochures folder from the Recycle Bin.
Can you restore My Folder? Why (or why not)?
Can you restore My Folder? Why (or why not)?
Close all Windows and Exit
1 If there are any windows remaining open, close them now by clicking on the red “X” in the upper right hand corner of the window.
2 Click the Start button.
3 Click the right arrow at the right end of the Shutdown button and click the Restart option in the menu (Figure 2.30).

Recap of what you have learned today
In this lesson you have learned to:
· Open Windows Explorer and expand and collapse the Windows Explorer folder hierarchy
· Create and rename folder
· Create a file, save it to a specific location and rename the file
· Copy and move files and folders
· Copy or move groups of files
· Learn right-click commands and identifying default (left-click) commands
· Delete files and folders
· Restore files and folders from the Recycle Bin