
Computer Group Tutoring Checklist
Tutoring is done One on One in the Computer Room at 10:00AM (By Appointment Only)
Limit Selections to 3 for the 1 hour time period
1. Scanning- Documents to PDF or Pictures to JPEG.
2. Printing- Documents and Pictures, 1 or 2 sided or multiple copies.
3. Copy and FAX- How to make standard copies and Faxes.
4. Snipits- Create a picture image from your screen and save it.
5. Email Others-.Learn Yahoo, AOL or HotMail.
6. Import Contacts- Transfer Contacts to your Email.
7. Make an Icon- Create a new Icon on you Desktop Screen.
8. Install Printer- Add the SC wireless printer to your Laptop.
9. Download Pictures- Transfer pictures from Camera or Email.
10. Pay Pal- Create a Pay Pal account.
11. Ebay- Create an Ebay account and learn to Buy or Bid.
12. Set up Laptop- Add Programs, Files and Icons for use at Sessions.
13. Programs- Install or Uninstall programs.
14. Flash Drives- Use External Drives. Thumb, CD or DVD.
15. Online Banking- Set up your BOA, Webster or Union Savings account.
16.
Internet Search- Narrowing Search.
17.
Cut and Paste- In Word or Email.
18.
Folder Setup- New or Move.
19.
Naming Files- Saving or Changing.
20.
Updating Prog- AVG Adobe, Win 7.
21.
Recycle Bin- Empty or Restore.
22.
Desktop Background- Change.
23.
Screen Saver- Setup Slideshow.
24.
Accessories- Date, Clock.
25.
Media Player- Music and DVD’s
26.
Keyboard- On Screen Mouse entry.
27.
Locating Files- Windows Explorer.
28.
Favorites List- Easy Access.
29. Other - You Describe
1. Scanning- Documents to PDF or Pictures to JPEG.
Here’s how to get started scanning at the Senior Center.
To scan anything, your computer must have what is known as a driver for the
HP 8500 A910 Printer, Copier, Fax and Scanner. You can use any SC computer
to Scan. If you selected Checklist no 8, use the installation disc to install the
SC printer as an extra printer on your computer. Make sure to indicate it is NOT
your default printer or it will change your home printing.
HP 8500 A910 Printer, Copier, Fax and Scanner. You can use any SC computer
to Scan. If you selected Checklist no 8, use the installation disc to install the
SC printer as an extra printer on your computer. Make sure to indicate it is NOT
your default printer or it will change your home printing.
Turn the computer on (let everything load up and have the computer idle and
connected to the internet)
connected to the internet)
Once your computer is on, and it recognizes the scanner (has installed
a driver for it) you are ready to scan.
a driver for it) you are ready to scan.
OK Let’s Scan. (This assumes Windows 7) Place the document for
scanning on the printer flat bed.
scanning on the printer flat bed.

Look for the Scanning Icon on the desktop and double click it.
Click on Scan


From here on in, you are close to home.
Just adjust the settings as desired for your scan.
Remember, ALL results will be in the form of an image.
Click the “Save” button in the blue bar above the list of scanned images.
You will get the following page:
You will get the following page:

There are THREE things to do here.
Check the “Save in” location to be sure that is where you want to save the image on your computer. In this case a “New” folder was created and called “A New Scan”. If it is not what you want to do, use the down arrow to select the folder that you want to save the image in. Once the folder is the one you want:
Go to “File name” and give the image a name that is appropriate, then:
Check the “Save as type” to be sure it is JPG, which is what you want to save it as.
Then simply click the “Save” button, and your done:

Congratulations you did it!
A PDF scan is almost the same and is selected on the first screen.
2. Printing- Documents and Pictures, 1 or 2 sided
or multiple copies.
or multiple copies.

The Print function from any software (or ctrl P) will go to the above final
choices before printing.
choices before printing.
Check the Name of the printer- Must be HP Officejet Pro 8500 A910 (Network).
Print Range- All or Pages 1-3.
Copies 1 or more. The option below allows 2 sided printing.
Click OK to start printing.

3. Copy and FAX- How to make standard Copies and Faxes


4. Snipits- Create a picture image from your screen and save it.
Use Snipping Tool to capture screen shots
You can use Snipping Tool to capture a screen shot, or Snip, of any object on your screen, and then annotate, save, or share the image.

Snipping Tool
You can capture any of the following types of snips:
· Free-form Snip. Draw a free-form shape around an object.
· Rectangular Snip. Drag the cursor around an object to form a rectangle.
· Window Snip. Select a window, such as a browser window or dialog box, that
you want to capture.
· Full-screen Snip. Capture the entire screen.
After you capture a snip, it's automatically copied to the Clipboard and the mark-up window.
From the mark-up window, you can annotate, save, or share the snip. The following procedures explain how to use Snipping Tool.
1. Click to open Snipping Tool.
2. Click the arrow next to the New button, select Free-form Snip, Rectangular Snip,
Window Snip, or Full-screen Snip from the list, and then select the area of your
screen that you want to capture.
If you want to capture a snip of a menu, such as the Start menu, follow these steps:
1. - Click to open Snipping Tool.
2. After you open Snipping Tool, press Esc, and then open the menu that you want
to capture.
3. Press Ctrl+PrtScn.
4. Click the arrow next to the New button, select Free-form Snip, Rectangular Snip,
Window Snip, or Full-screen Snip from the list, and then select the area of your
screen that you want to capture.
· After you capture a snip, you can write and draw on or around the snip in the mark-up window.
1. After you capture a snip, click the Save Snip button in the mark-up window.
2. In the Save As dialog box, enter a name for the snip, choose a location where to
save the snip, and then click Save.
· After you capture a snip, click the arrow on the Send Snip button, and then select an
option from the list.
For more information about Snipping Tool, see Snipping Tool: frequently asked questions.
Can I capture a snip of a menu, such as a shortcut menu or the Start menu?
Yes. Here's how:
1. Click to open Snipping Tool.
2. Press Esc, and then open the menu that you want to capture.
3. Press Ctrl+PrtScn.
4. Click the arrow next to the New button, select Free-form Snip, Rectangular Snip, Window Snip, or Full-screen Snip from the list, and then select the area of your screen that you want to capture.
Take a screen capture (print your screen)
Sometimes it's easier to show someone what you're seeing on your computer screen instead of explaining it. In Windows, one easy solution is the PrtScn key. When you press it, an image of your screen is copied to the Clipboard. This is called a screen capture or screen shot.
To print the screen capture or send it to someone in an e‑mail, you'll first have to paste it into Paint or some other image-editing program and save it.
To take a screen capture of the entire screen
It's also possible to capture a specific active window when you press PrtScn.
To capture an active window.
Notes
· On some keyboards, PrtScn might appear as PRTSC, PRTSCN, or a similar abbreviation.
· Certain laptops and other mobile devices that lack a PrtScn key might use other key combinations, such as FN+Insert, to capture the screen. Check the manual the came with your laptop or device for specific instructions.
5. Email Others-.Learn Yahoo, AOL or HotMail.
The following are Accounts for this Tutorial:
Service User ID Password

6. Import Contacts- Transfer Contacts to your Email.
Contacts for the Computer Group to Import to your EMail Account.
Should work for non GMail Accounts.
1. Download the file. (Should be csv file)
2. Click on "Contacts"
3. Click on "More"
4. Click on "Import"
5. Click on "Choose File"
6. Click on the "Downloads Folder or Folder with the file"
7. Find the file "Google csv" and Click it
8. Click "Open"
9. Click "Import"
7. Making an ICON to get to the BWSC Blog
Return to the Desktop on your computer.
Right Click the mouse.
Select New and slide over and select Shortcut and
enter.

In the Type the location of the Item box.

If you are on a Web Page, you can Copy and Paste
the URL to the Type the location field.
In the Type in the name of this Shortcut box.
Key in Senior Center Blog and hit enter.


You will now have an Icon on your Desktop. It will have a different image.
8. Install Printer- Add the SC wireless printer to your Laptop.
BWSC-Printing from your Laptop
In order to Print a document at the Senior Center from your Laptop.
you must install the “Wireless HP 8500” on your Laptop.

Here is how to do it.


Install the software for the printer from the CD at the Senior Center. Just follow the instructions.
If the software is installed by the wireless Printer is not activated on the computer, do this:
Click the Start Button

Click on Devices and Printers

Click on Add a printer

Click on Devices and Printers
Click on Add a printer
Click on Add a Network printer


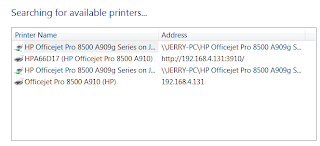


Click on Select the SC Network printer
Click on Next
Click Install printer driver- select HP and the 8500 A910
Name the Printer Accept Shown Printer Name: HP Office Jet 8500 A910 (Nework)
Indicate Select Share
Indicate Not Default Remove the “Check”
Click Print a test page and then Finish
9. Download Pictures- Transfer pictures from Camera or Email.
From Your Digital Camera to your Computer:
Set your computer to the Desktop.
Attach the camera to the PC with the USB wire.
Turn on the Camera and wait for the Action window.
Double click the Photo Gallery Icon to import.
Option 1 - Import all New pictures only:
Type the Name for the desired folder. (May be an existing one).
Click Import.
Photo Gallery will open with the imported pictures placed.
Option 2 – Review, Organize and Group to Import pictures:
Click Next.
Select (Highlight) the pictures to import.
Click on the little Folder shown and type the Name for the desired folder. (May be an existing one). You can type the same folder name for each group or a different name to place pictures in a new folder.
Click Import.
Photo Gallery will open with the imported pictures to the Folders chosen.
Downloading G-Mail Pictures
When using Google Chrome
From Your E-Mail with a picture attached:
Next to the picture, click on Download.
In the lower left corner, click on the Photo Gallery Icon.
In the upper left corner double click the Photo Gallery Icon to Edit, Organize to open Photo Gallery.
You can now Drag and Drop the picture from the Download folder to an existing picture folder or create a new folder with a new name where you can place the picture.
To drag and drop, place the arrow on the picture and press and hold the left button of the mouse. Slide the mouse over to the folder desired and when it highlights, release the button.
10. Pay Pal - Create a Pay Pal account.
Create a PayPal account for you at http//www.paypal.com

11. Ebay- Create an Ebay account and learn to Buy or Bid.

12. Set up Laptop- Add Programs, Files and Icons for use at Sessions.
This is currently done by Jerry and Includes:
Installing - AVG, Adobe Reader, Picasa, Photo Gallery, Movie Maker, Chrome and Introduction to Computers.
Copying to PC - Class Folders- Docs, Xls, Ppt, Pictures and Videos.
Copy Icons to Desktop – Yellow Mouse, Mouserciser, Cut & Paste, Gmail, Ebay and Senior Center Blog.
13. Programs- Install or Uninstall programs.
We will Install and Uninstall a program during this session. Various software will be used.
Install a New Computer Program
You install new computer programs so that you can do new things by using those programs — things you can’t do with the programs you already have. You can install a program to add new capabilities to your computer, such as creating greeting cards or drafting legal documents. Some programs are free; others cost money. Programs designed for professional work may cost hundreds of dollars.
To install programs from a CD or DVD:
Insert the program disc into your computer’s disc drive or tray, label side up (or, if your computer has a vertical disc slot instead, insert the disc with the label side facing left).
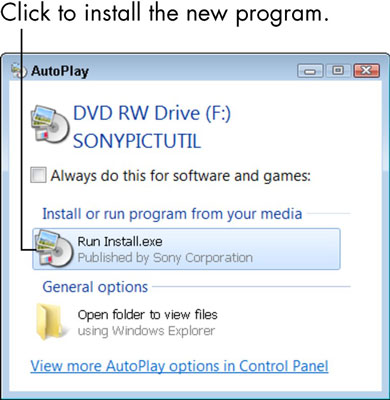
The AutoPlay dialog box appears.
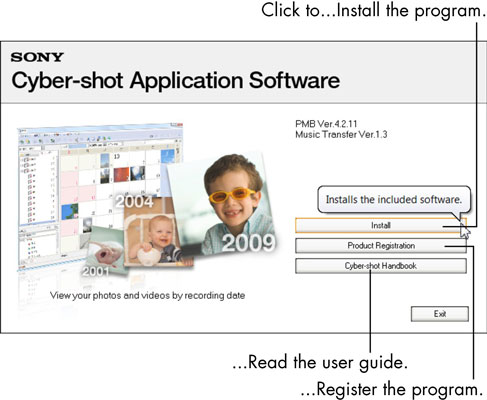
- Click the option to run Install or Setup.User Account Control may ask if you really want to run this program. (Windows 7 tries to keep you from installing software unintentionally by asking for confirmation.)If nothing happens when you insert the disc, choose Start→Computer to open the Computer window; double-click the icon for your DVD or CD drive; and then double-click a program named Setup or Install.
- If the installer offers a language selection, choose yours; likewise, agree to the end-user license agreement, if requested.Many installers require you to accept an end-user license agreement (EULA). You can read the EULA or not, but you can’t install without agreeing to its terms.
- If the installer offers Express or Custom installation options, choose the Express option to let the installer set up the program without further input from you.The Custom option or Advanced Settings allows you to specify where to install the program and, perhaps, which parts of the program to install. Some installers provide other options to install documentation and other programs or to register the program.
- As the installer program continues to run and display dialog boxes, click the Next or Continue button.You proceed to the next dialog box each time you click.
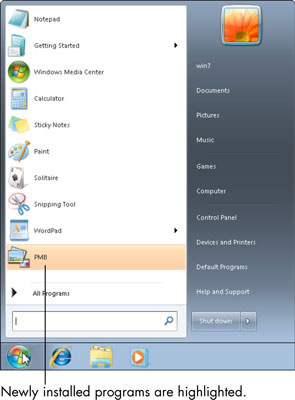
- Click the Finish or Close button in the last step of the installer program to complete the process.In a few cases, the setup program may ask you to restart Windows 7. In this case, you don’t have to restart immediately, but you won’t be able to use the new program until you do restart.
Remove a Program from Your Computer
If you don’t use a program on your computer, you may want to consider removing, or uninstalling, it. Removing a program from your computer may improve your computer’s performance, which can get bogged down when your hard drive is too cluttered.
To remove a program from your computer:
- Choose Start→Control Panel→Uninstall a Program (under the Programs and Features category).The resulting Uninstall or Change a Program window appears.
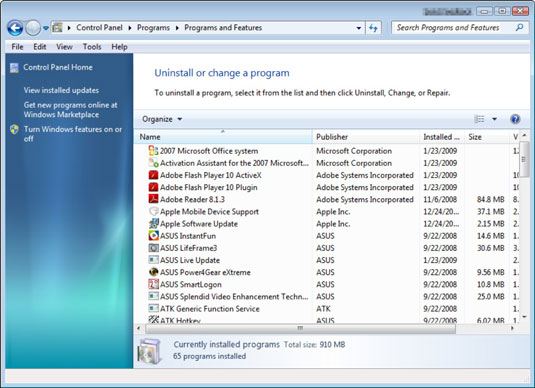
- Click a program and then click the Uninstall (sometimes labeled Uninstall/Change) button that appears.Although some programs will display their own uninstall screen, in most cases, a confirmation dialog box appears.If you click the Change or Uninstall button, some programs will simply be removed with no further input from you. Be really sure that you don’t need a program before you remove it, or that you have the original software on disc (or disk) so you can reinstall it should you need it again.
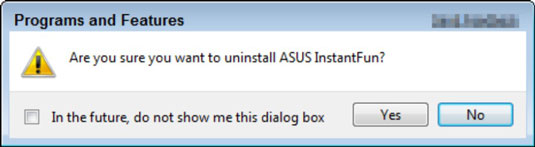
- If you’re sure that you want to remove the program, click Yes in the confirmation dialog box.A dialog box shows the progress of the procedure; it disappears when the program has been removed.
- Click the Close button.The Uninstall or Change a Program window closes.
14. Flash Drives- Use External Drives. Thumb, CD or DVD.
CD (Compact Disc): This disc can hold 700 MB of data.

A DVD disc looks the same but can contain 4.7GB of data.


To use a CD or DVD you will need a CD/ Drive. To use a disc, push the button on the Drive. A tray will come out. Place the disc on the tray with the label on the top then push the button again to insert the disc. Pressing the button again will eject the disc. Most Laptops have a combo CD/ DVD Drive.
The Flash Drive attaches to the computer in a USB port usually located on the side of a Laptop or in the back of a Desktop. They can contain from 2GB to 16GB+ of data.

When a Flash Drive is plugged into a USB port, it will automatically install and you can open the drive as follows: By Pop up.


By looking for the Drive.
Click


15 Banking- Set up your BOA, Webster or Union Savings account. (Must have A/C)
Set up your account with online transactions
Bank of America: Art
Webster Bank: Jerry
Union Savings: Jim
16. Internet Search- Narrowing Search.
16. Internet Search- Narrowing Search.
17. Cut and Paste- In Word or Email.
18. Folder Setup- New or Move.
19. Naming Files- Saving or Changing.
20. Updating Prog- AVG Adobe, Win 7.
21. Recycle Bin- Empty or Restore.
How to Empty Your Computer’s Recycle Bin
The Recycle Bin on your computer holds recently deleted items. Your old files sit in the Recycle Bin, and you can retrieve them until you empty it or until it reaches its maximum size limit, and Windows automatically dumps a few files.
After you empty the Recycle Bin, all files in it are unavailable to you.
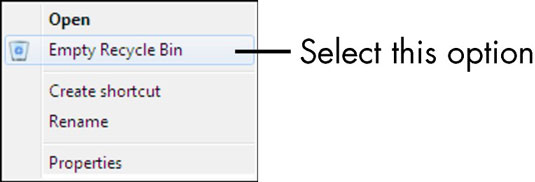
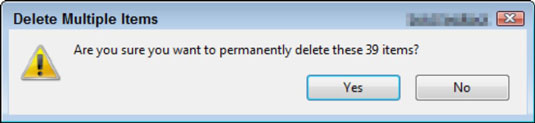
To manually empty the Recycle bin, right-click the Recycle Bin icon on the Windows 7 desktop and choose Empty Recycle Bin from the menu that appears. In the confirmation dialog box that appears, click Yes. A progress dialog box indicates that the contents are being deleted.
Up until the moment you permanently delete items by performing the preceding steps, you can retrieve items from the Recycle Bin by right-clicking the desktop icon and choosing Open. Select the item you want to retrieve and then click the Restore This Item link near the top of the Recycle Bin window.
You can modify the Recycle Bin properties by right-clicking it and choosing Properties. In the dialog box that appears, you can change the maximum size for the Recycle Bin and whether to immediately delete files you move to the Recycle Bin. You can also deselect the option of having a confirmation dialog box appear when you delete Recycle Bin contents.
22. Desktop Background- Change.
How to Change Your Computer’s Desktop Background
How to Change Your Computer’s Desktop Background
The Windows desktop gives you the flexibility to personalize it. You can display your favorite picture of your grandchildren on your desktop or use the color of your choice as your background. The possibilities for changing your computer’s desktop background are almost endless.
You can even apply a desktop theme, which applies several color and image settings at once. However, if you apply a desktop theme, you overwrite whatever desktop settings you’re making in the following steps. If you apply a desktop theme and then go back and make desktop settings, you replace the theme’s settings.
To change your computer’s desktop background:
- Right-click the desktop and choose Personalize from the shortcut menu.The Personalization window appears.
- Click the Desktop Background link.The Desktop Background dialog box appears.
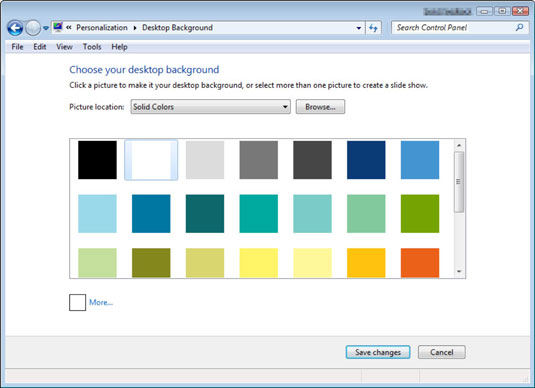
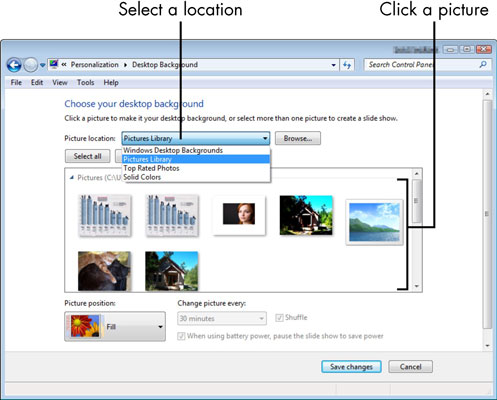
- Select a category of desktop background options from the Picture Location list box and then click the image from the background preview list that you want to use.The background is previewed on your desktop.
- Click Save Changes.Your settings are applied, and the dialog box closes. You can then close the Personalization window.
23. Screen Saver- Setup Slideshow.
How to Set Up a Screen Saver for Your Computer
If you want an animated sequence to appear on your desktop when your computer isn’t in use for a period of time, set up a screen saver. Screen savers are animations that appear after your computer has remained inactive for a time.
To set up a screen saver, follow these steps:
- Right-click the desktop and choose Personalize.The Personalization window appears.
- Click the Screen Saver button.The Screen Saver Settings dialog box appears.
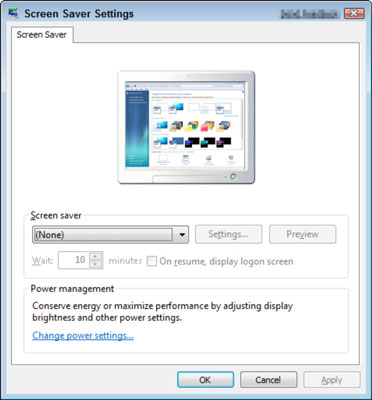
- From the Screen Saver drop-down list, choose a screen saver. Use the arrows in the Wait xx Minutes text box to set the number of inactivity minutes to determine how long Windows 7 waits before displaying the screen saver.Some screen savers allow you to modify their settings: for example, how fast they display or how many lines they draw on-screen. To customize this, click the Settings button when in the Screen Saver Settings dialog box.
- Click the Preview button to preview your screen saver of choice.If you like what you see, you’re ready to save your preview.

- Click to stop the preview, click OK, and then click the Close button.The Personalization window closes.
24. Accessories- Date, Clock.
How to Set the Date and Time on Your Computer
The date and clock on your computer keep good time, but you might have to provide the correct date and time for your location. To set the date and time on your computer:
- Press the Windows key on your keyboard to display the taskbar if it isn’t visible.The Windows key has the Windows logo on it.
- Right-click the Date/Time display on the taskbar and then choose Adjust Date/Time from the shortcut menu.The Date and Time dialog box appears.
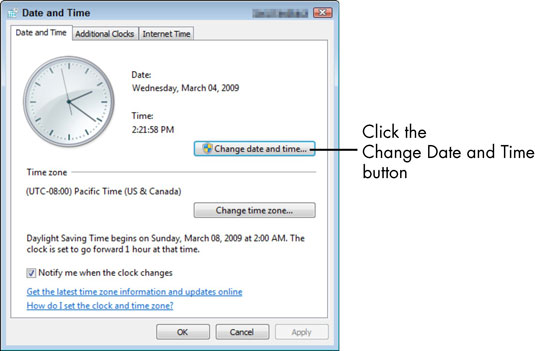
- Click the Change Date and Time button.The Date and Time Settings dialog box appears.
- Enter a new time in the Time field.You can also use the up and down arrows next to that field to change the time.
- If you wish, click on a new date in the calendar display and then click OK.You can also change the time zone, if necessary.
- Click the Change Time Zone button, choose another option from the Time Zone drop-down list, and click OK.If you don’t want your computer to adjust for Daylight Saving Time, click Change Time Zone and click the Automatically Adjust Clock for Daylight Saving Time check box to turn this feature off.
- Click OK again.Clicking OK the second time applies the new settings and closes the dialog box.
25. Media Player- Music and DVD’s
How to Listen to Music on Windows Media Player
Windows Media Player plays media. The term media on computers refers to something other than text: Audio and video are examples of media. Audio is a catchall term for music and other sound files, such as books on CD.
You can use Media Player to play the sample music included with Windows 7. If you have an audio CD handy, you can play it on your computer using Media Player. To make playing that CD even more convenient, you can copy the audio files to your computer.
You can buy music online and download the tracks directly to your computer.
To start Windows Media Player:
- Click its icon (a white triangle on an orange circle on a blue square) in the taskbar.The first time you start Media Player, the initial settings screen appears.
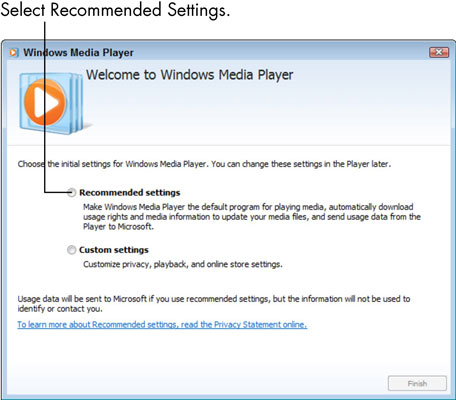
- Click Recommended Settings and Finish.After a brief delay, the Media Player Library displays music that comes with Windows 7 and any music already copied to your computer.
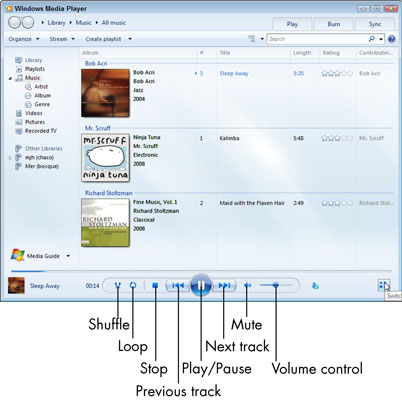
- Click Play to play the music.You can adjust the volume with the slider. Mute and unmute the music with the Mute/Unmute button. Pause the music and resume playing. Stop the music. Play any music. You can turn on shuffle, which randomly mixes the tracks you play.Click the Loop button to turn on repeat, which continuously plays all the tracks again after all have played. The Previous button skips to the previous track, while the Next button skips to the next track. Click the Now Playing button to reduce the player to a small size.
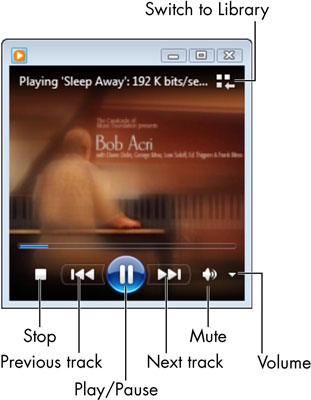
- Click the Switch to Now Playing button to the right of the toolbar to shrink Media Player to a smaller window.To return to the larger window, click the Switch to Library button.
26. Keyboard- On Screen Mouse entry.
How to Use the On-Screen Keyboard Feature
Clicking keys with your mouse may be easier for some people than using a regular keyboard. If you fall into that group, then you’ll want to use your computer’s on-screen keyboard feature.
To use the on-screen keyboard:
- Choose Start→Control Panel→Ease of Access category.The Ease of Access window appears.
- Click the Ease of Access Center link.The Ease of Access Center dialog box appears.
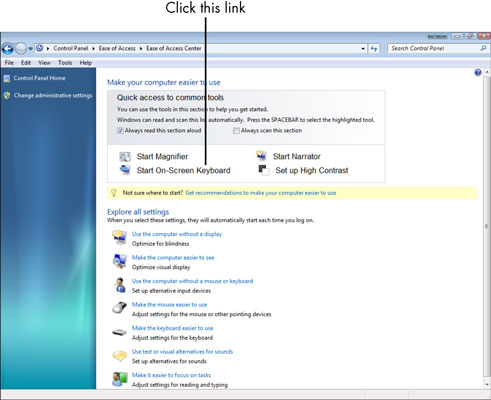
- Click Start On-Screen Keyboard.The on-screen keyboard appears.
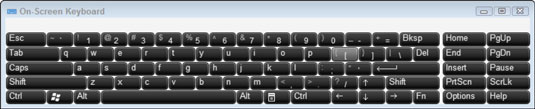
- Open a document in any application where you can enter text.You can then click the keys on the on-screen keyboard to make entries.
- To use keystroke combinations (such as Ctrl+Z), click the first key (in this case, Ctrl) and then click the second key (Z).You don’t have to hold down the first key as you do with a regular keyboard.
- To change settings, click the Options key on the on-screen keyboard, choose an option in the Options dialog box, and click OK.You can change settings such as how you select keys (Typing Mode) or the font used to label keys (Font).You can set up the Hover typing mode to activate a key after you hover your mouse over it for a predefined period of time (x number of seconds). If you have arthritis or some other condition that makes clicking your mouse difficult, this option can help you enter text. Click the Hover over Keys item in the Options dialog box and use the slider to set how long you have to hover before activating the key.
- Click the Close button to stop using the online keyboard.
27. Locating Files- Windows Explorer.
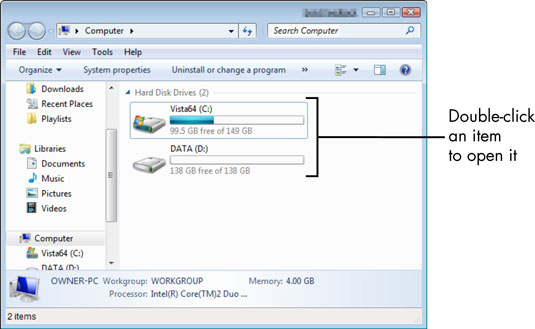
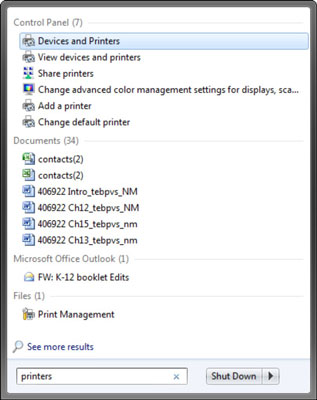
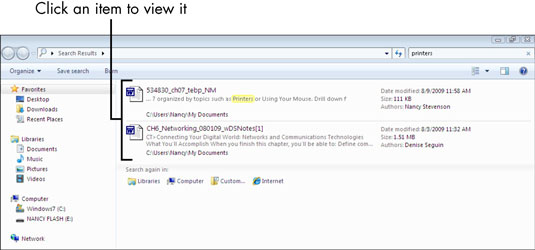
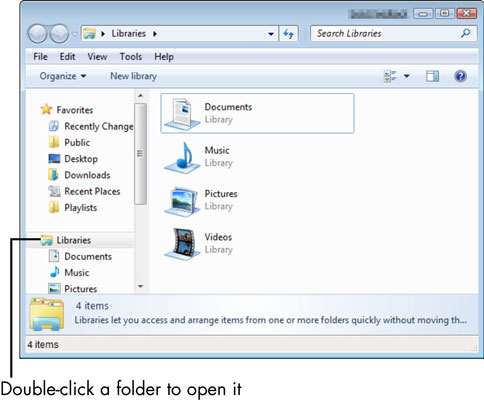
How to Locate Files and Folders
Can’t remember what you named a folder or where on your computer or storage media you saved it? You can open the Computer window to locate it or perform a Search.

.PNG)
.PNG)
28. Favorites List- Easy Access.
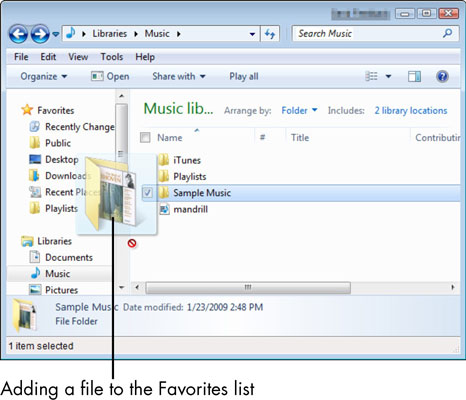
Add a File or Folder to Your Favorites List
The Favorites list in the Start menu offers a quick way to access frequently used items. If you’re constantly downloading and editing photos or updating your shopping list in Word, those items are good candidates for your Favorites List.
To add a file or folder to your Favorites List:
- Locate the files or folders that you want to make a Favorite by using Windows Explorer.To open Windows Explorer, right-click Start and choose Open Windows Explorer.
- Click a file or folder and drag it to any of the Favorites folders.The Favorites folders appear in the Navigation pane on the left.
- Choose Start→Favorites.A submenu that contains a list of your Favorites appears.

- Click an item to open it.If the Favorites item doesn’t display on your Start menu, right-click the Start menu and choose Properties. On the Start Menu tab in the Taskbar and Start Menu Properties dialog box, click the Customize button. Make sure that Favorites Menu is selected and then click OK twice to save the setting.
29. Other - You Describe