
Setting Up Your Excel Environment
Introduction

Before you begin creating spreadsheets in Excel, you may want to set up your Excel environment and become familiar with a few key tasks and features such as how to minimize and maximize the Ribbon, configure the Quick Access toolbar, switch page views, and access your Excel options.
Exploring and Setting Up Your Excel Environment
Exploring the Excel Environment
The tabbed Ribbon menu system is how you navigate through Excel and access the various Excel commands. If you have used previous versions of Excel, the Ribbon system replaces the traditional menus. Above the Ribbon in the upper-left corner is the Microsoft Office Button. From here, you can access important options such as New, Save, Save As, and Print. By default the Quick Access Toolbar is pinned next to the Microsoft Office Button, and includes commands such as Undo and Redo.
At the bottom, left area of the spreadsheet, you will find worksheet tabs. By default, three worksheet tabs appear each time you create a new workbook. On the bottom, right area of the spreadsheet you will find page view commands, the zoom tool, and the horizontal scrolling bar.

At the bottom, left area of the spreadsheet, you will find worksheet tabs. By default, three worksheet tabs appear each time you create a new workbook. On the bottom, right area of the spreadsheet you will find page view commands, the zoom tool, and the horizontal scrolling bar.

To Zoom In and Out:

- Locate the zoom bar in the bottom, right corner.
- Left-click the slider and drag it to the left to zoom out and to the right to zoom in.
To Scroll Horizontally in a Worksheet:
- Locate the horizontal scroll bar in the bottom, right corner.
- Left-click the bar and move it from left to right.
To Change Page Views:

- Locate the Page View options in the bottom, right corner. The Page View options are Normal, Page Layout, and Page Break.
- Left-click an option to select it.
The default is Normal View.
To Add Commands to the Quick Access Toolbar:

- Click the arrow to the right of the Quick Access toolbar.
- Select the command you wish to add from the drop-down list. It will appear in the Quick Access toolbar.
OR
- Select More Commands from the menu and a dialog box appears.
- Select the command you wish to add.
- Click the Add button.
- Click OK.
The Save, Undo, and Redo commands appear by default in the Quick Access toolbar. You may wish to add other commands to make using specific Excel features more convenient for you
To Minimize and Maximize the Ribbon:
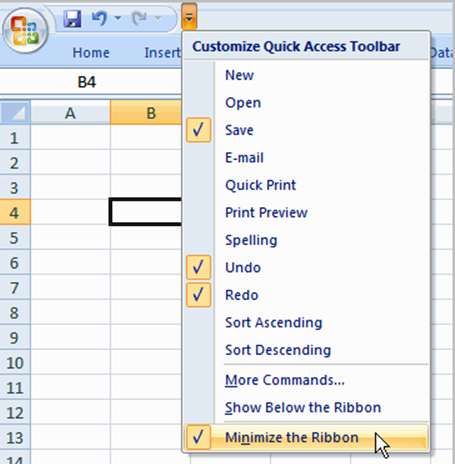
- Click the drop-down arrow next to the Quick Access toolbar.
- Select Minimize Ribbon from the list. The Ribbon disappears.
- To maximize the ribbon, click the arrow again and select Minimize the Ribbon to toggle the feature off.
You can also minimize and maximize the Ribbon by right-clicking anywhere in the main menu and selecting Minimize the Ribbon in the menu that appears.
The new, tabbed Ribbon system replaces traditional menus in Excel 2007. It is designed to be responsive to your current task and easy to use; however, you can choose to minimize the Ribbon if you would prefer to use different menus or keyboard shortcuts.
The Microsoft Office Button
The Microsoft Office Button appears at the top of the Excel window. When you left-click the button, a menu appears. From this menu you can create a new spreadsheet, open existing files, save files in a variety of ways, and print. You can also add security features, send, publish, and close files.


To Change the Default Excel Options:
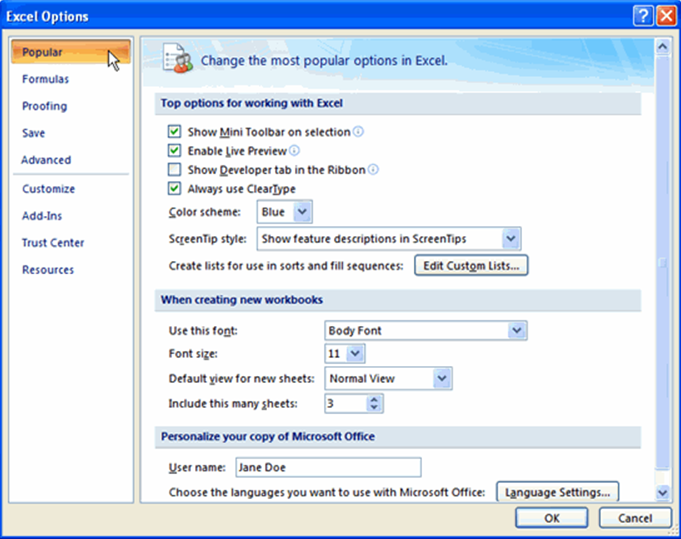
- Click the Excel Options button. A dialog box will appear.
- Select a category on the left to access different Excel options.
- Modify any of the default settings.
- Click OK.
As you learn more about Excel and become proficient at using it, you may want to modify some of the settings. As a beginning user, it is usually best to leave the default settings
.
Challenge!
- Open Excel.
- Practice using the Zoom tool.
- Minimize and maximize the Ribbon.
- Click the Microsoft Office Button and review the menu options.
- Add two commands to the Quick Access toolbar.
- Continue to explore the Excel environment.
Starting a Workbook
Introduction
You will need to know how to insert text and numbers into Excel workbooks to be able to use it to calculate, analyze, and organize data. In this lesson, you will learn how to create a new workbook, insert and delete text, navigate a worksheet, and save an Excel workbook.
Your First Workbook
To Create a New, Blank Workbook:

- Left-click the Microsoft Office Button.
- Select New. The New Workbook dialog box opens and Blank Workbook is highlighted by default.
- Click Create. A new, blank workbook appears in the window.
When you first open Excel, the software opens to a new, blank workbook.

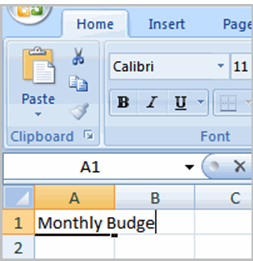
To Insert Text:

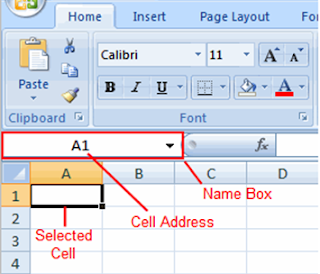
- Left-click a cell to select it. Each rectangle in the worksheet is called a cell. As you select a cell, the cell address appears in the Name Box.

- Enter text into the cell using your keyboard. The text appears in the cell and in the formula bar.
Each cell has a name, or a cell address based on the column and row it is in. For example, this cell is C3 since it is where column C and row 3 intersect.


To Edit or Delete Text:
- Select the cell.
- Press the Backspace key on your keyboard to delete text and make a correction.
- Press the Delete key to delete the entire contents of a cell.
You can also make changes to and delete text from the formula bar. Just select the cell and place your insertion point in the formula bar.
To Move Through a Worksheet Using the Keyboard:
- Press the Tab key to move to the right of the selected cell.
- Press the Shift key and then the Tab key to move to the left of the selected cell.
- Use the Page Up and Page Down keys to navigate the worksheet.
- Use the arrow keys.
To Save the Workbook:
- Left-click the Microsoft Office Button.
- Select Save or Save As.
o Save As allows you to name the file and choose a location to save the spreadsheet. Choose Save As if you'd like to save the file for the first time or if you'd like to save the file as a different name.
o Select Save if the file has already been named.
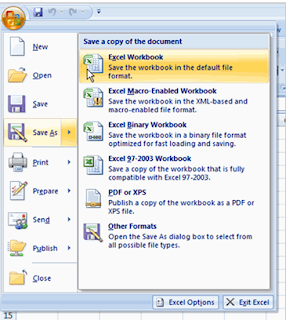

You can save a workbook in many ways, but the two most common are as an Excel Workbook, which saves it with a 2007 file extension, and as an Excel 97-2003 Workbook, which saves the file in a compatible format so people who have earlier versions of Excel can open the file.
Challenge!
- Open Excel.
- Create a new, blank workbook.
- Practice entering text into cells.
- Practice deleting text using the Backspace and Delete keys.
- Navigate through the sheet using the Tab key.
- Save the spreadsheet.
Modifying Columns, Rows, & Cells
Introduction

When you open a new, blank workbook, the cells, columns, and rows are set to a default size. You do have the ability to change the size of each, and to insert new columns, rows, and cells, as needed. In this lesson, you will learn various methods to modify the column width and row height, in addition to how to insert new columns, rows, and cells.
Columns, Rows, and Cells
.
To Modify Column Width:

- Position the cursor over the column line in the column heading and a double arrow will appear.
- Left-click the mouse and drag the cursor to the right to increase the column width or to the left to decrease the column width.
- Release the mouse button.
OR

- Left-click the column heading of a column you'd like to modify. The entire column will appear highlighted.

- Click the Format command in the Cells group on the Home tab. A menu will appear.
- Select Column Width to enter a specific column measurement.
- Select AutoFit Column Width to adjust the column so all the text will fit.
To Modify the Row Height:
- Position the cursor over the row line you want to modify and a double arrow will appear.

- Left-click the mouse and drag the cursor upward to decrease the row height or downward to increase the row height.
- Release the mouse button.
OR

- Click the Format command in the Cells group on the Home tab. A menu will appear.
- Select Row Height to enter a specific row measurement.
- Select AutoFit Row Height to adjust the row so all the text will fit.
To Insert Rows:


- Select the row below where you want the new row to appear.
- Click the Insert command in the Cells group on the Home tab. The row will appear.
The new row always appears above the selected row.
Make sure that you select the entire row below where you want the new row to appear and not just the cell. If you select just the cell and then click Insert, only a new cell will appear.
To Insert Columns:
- Select the column to the right of where you want the column to appear.
- Click the Insert command in the Cells group on the Home tab. The column will appear.
The new column always appears to the left of the selected column. For example, if you want to insert a column between September and October, select the October column and click the Insert command.

Make sure that you select the entire column to the right of where you want the new column to appear and notjust the cell. If you select just the cell and then click Insert, only a new cell will appear.
To Delete Rows and Columns:
- Select the row or column you’d like to delete.
- Click the Delete command in the Cells group on the Home tab.
Challenge!
Use the Budget or any Excel workbook you choose to complete this challenge.
- Open a workbook.
- Insert a column.
- Insert a row.
- Delete a column.
- Change the width of a column using AutoAdjust.
- Change the height of a row.
- Close and save the file.
Creating Simple Formulas
Introduction

Excel can be used to calculate and analyze numerical information; however, you will need to know how to write formulas to maximize Excel's capabilities. A formula is an equation that performs a calculation using values in the worksheet. In this lesson you will learn how to create simple formulas using mathematical operators such as the addition, subtraction, multiplication, and division signs.
Simple Formulas
To Create a Simple Formula that Adds Two Numbers:

- Click the cell where the formula will be defined (C5, for example).
- Type the equal sign (=) to let Excel know a formula is being defined.
- Type the first number to be added (e.g., 1500)
- Type the addition sign (+) to let Excel know that an add operation is to be performed.
- Type the second number to be added (e.g., 200)
- Press Enter or click the Enter button on the Formula bar to complete the formula.
To Create a Simple Formula that Adds the Contents of Two Cells:
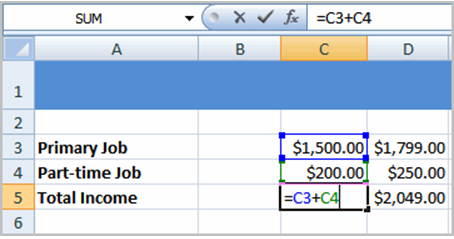
- Click the cell where the answer will appear (C5, for example).
- Type the equal sign (=) to let Excel know a formula is being defined.
- Type the cell number that contains the first number to be added (C3, for example).
- Type the addition sign (+) to let Excel know that an add operation is to be performed.
- Type the cell address that contains the second number to be added (C4, for example).
- Press Enter or click the Enter button on the Formula bar to complete the formula.
To Create a Simple Formula using the Point and Click Method:


- Click the cell where the answer will appear (C30, for example).
- Type the equal sign (=) to let Excel know a formula is being defined.
- Click on the first cell to be included in the formula (C5, for example).
- Type the subtraction sign (-) to let Excel know that a subtraction operation is to be performed.
- Click on the next cell in the formula (C29, for example).
- Press Enter or click the Enter button on the Formula bar to complete the formula.
To Create a Simple Formula that Multiplies the Contents of Two Cells:

- Select the cell where the answer will appear (E32, for example).
- Type the equal sign (=) to let Excel know a formula is being defined.
- Click on the first cell to be included in the formula (C9, for example) or type a number.
- Type the multiplication symbol (*) by pressing the Shift key and then the number 8 key. The operator displays in the cell and Formula bar.
- Click on the next cell in the formula or type a number (12, for example).
- Press Enter or click the Enter button on the Formula bar to complete the formula.
To Create a Simple Formula that Divides One Cell by Another:
- Click the cell where the answer will appear.
- Type the equal sign (=) to let Excel know a formula is being defined.
- Click on the first cell to be included in the formula.
- Type a division symbol. (/) The operator displays in the cell and Formula bar.
- Click on the next cell in the formula.
- Enter or click the Enter button on the Formula bar to complete the formula.
Using Cell References
As you can see, there are many ways to create a simple formula in Excel. Most likely you will choose one of the methods that enters the cell address into the formula, rather than an actual number. The cell address is basically the name of the cell and can be found in the Name Box


The following example uses actual numbers in the formula in C5.
When a cell address is used as part of a formula, this is called a cell reference. It is called a cell reference because instead of entering specific numbers into a formula, the cell address refers to a specific cell. The following example uses cell references in the formula in C30.


Challenge!
Use the Budget or any Excel workbook you choose to complete this challenge.
- Write a simple addition formula.
- Write a simple subtraction formula using the point and click method.
- Write a simple multiplication formula using cell references.
- Write a simple division formula.
Working with Cells
Introduction

It is important to know how to move information from one cell to another in Excel. Learning the various ways will save you time and make working with Excel easier. Certain methods are more appropriate depending on how much information you need to move and where it will reside on the spreadsheet. In this lesson you will learn how to cut, copy, and paste, as well as drag and drop information.
Working with Cells
To Copy and Paste Cell Contents:


- Select the cell or cells you wish to copy.
- Click the Copy command in the Clipboard group on the Home tab. The border of the selected cells will change appearance.
- Select the cell or cells where you want to paste the information.
- Click the Paste command. The copied information will now appear in the new cells.
To select more than one adjoining cell, left-click one of the cells, drag the cursor until all the cells are selected, and release the mouse button.
The copied cell will stay selected until you perform your next task, or you can double-click the cell to deselect it.
To Cut and Paste Cell Contents:
- Select the cell or cells you wish to copy.
- Click the Cut command in the Clipboard group on the Home tab. The border of the selected cells will change appearance.
- Select the cell or cells where you want to paste the information.
- Click the Paste command. The cut information will be removed from the original cells and now appear in the new cells.
The keyboard shortcut for Paste is the Control Key and the V key.
To Drag and Drop Information:


To Use the Fill Handle to Fill Cells:
- Position your cursor over the fill handle until the large white cross becomes a thin, black cross.
Left-click your mouse and drag it until all the cells you want to fill are highlighted.Release the mouse button and the information appears in the new location.

- Select the cell or cells you wish to move.
- Position your mouse pointer near one of the outside edges of the selected cells. The mouse pointer changes from a large, white cross to a black cross with 4 arrows.
The fill handle doesn't always copy information from one cell directly into another cell. Depending on the data entered in the cell, it may fill the data in other ways. For example, if I have the formula =A1+B1 in cell C1, and I use the fill handle to fill the formula into cell C2, the formula doesn't appear the same in C2 as it does in C1. Instead of =A1+B1, you will see =A2+B2.
You can use the fill handle to fill cells horizontally or vertically.
Challenge!
Use the Budget or any Excel workbook you choose to complete this challenge.
- Copy and paste information from one cell to another cell.
- Use the Cut command to remove information from one cell and then paste it into another cell.
- Use the fill handle to fill 2 or more cells.
- Drag and drop information from one place in the spreadsheet to another location.