
Managing Pictures
Libraries: Pictures
Organize your pictures in 5 easy steps…no kidding!

Introduction
This simple method for organizing your pictures is based on Events. The steps are all centered on creating a folder structure organized around the events that occur in your life. The steps are simple: establish one folder as your base, create large categories of events, create a sub-folder for each year, create a precise name for each folder containing pictures from a particular event. Last but not least…be consistent.

This picture organization method is based on events. Why? It’s simple: our lives are filled with events, some more important than others. From getting up in the morning, going to work, getting a hair cut to traveling, getting married and giving birth, the events in our lives vary in their impact to our lives. Those events that are most important to our lives become the subject of our pictures. So the basic criterion of organization must match the main subject of our lives.
STEP 1: Have only ONE folder that has all your pictures folders.
All your pictures folders should be contained in only one folder. Usually it’s My Documents/My Pictures or just My Pictures. You must start here, otherwise you will be lost.
STEP 2: Add a folder for each significant category of events
The next step is to create a folder for each significant category of events. The criterion for this folder structure is events. We’re creating folders for significant categories of Events.
The criterion for this folder structure is events. We’re creating folders for significant categories of events. These folders DO NOT represent the subject of the pictures, but they are groupings of events.
The structure shown below outlines the folder structure created for a fictitious family: CARLY(pictures containing events for their daughter Carly), FAMILY (pictures containing family events), FRIENDS (for all the pictures containing events that involve their friends), CHURCH (for all pictures containing church events) and WORK (for pictures containing work events). Also, they’re adding a folder called MISC to include miscellaneous events and other pictures.
REMEMBER: These folders DO NOT represent the subject of the pictures, but they are groupings of events. We’re just grouping the events into large categories. This way you’re dividing a large quantity of event pictures into more manageable chunks.
STEP 2: Add Category Folders
» My Pictures
» CARLY
» CHURCH
» FAMILY
» FRIENDS
STEP 3: Add a folder for each year.
There is one thing still missing. While adding categories certainly helps, the FAMILY folder will grow very large very quickly as time passes by and events accumulate. So, “divide and conquer” is called for here. For this reason I recommend creating a folder for Each Year in the FAMILY folder. You may add folders for years in the other category folders as well but that may be too much for a folder like WORK where there might be only one or two events per year. However, if you anticipate that any category of events will grow very much, then you should add folders for each year.
If you anticipate that a category of events (i.e. FAMILY, WORK) will grow very much, then add a sub-folder for each year in that category folder. This way you can divide the quantity of pictures even more.
STEP 3: Add Year Folders
» My Pictures
» CARLY
» CHURCH
» FAMILY
» 2009
» 2010
» 2011
» 2012
» FRIENDS
STEP 4: Create and name your folders.
This is the most important step. The folder structure you create here is the backbone of my folder based method. In order for us to remember an event we need two pieces of information, namely an approximate date and an approximate description. You must include both of these in your folder names. You must name your folders as follows:
§ 4 digits for the year (i.e. 2012)
§ 2 digits for the month (i.e. 08 for August)
§ 2 digits for the day – the day is not required, but if you remember it put it in the folder name. If an event spans more than one day, use only the month.
§ description – you need two things: the place and a description of the event. Use one or two words to describe the place and a max of 3 short words to describe the event.
§ Don’t leave blank spaces in the folder names, instead use the hyphen (or underscore) sign between your words. This way your folders will be automatically sorted properly.
§ Examples of good folder names: 06_08_11-tony_restaurant_dads_bday, 05-07-california_family_trip.
§ Examples of good descriptions: “kings_cyn_hiking”, “mandalay_beach_church_picnic”, “grandma_visit”, “our_house_christmas”, “petersens_4th_july”
STEP 4: Create and name your folders
You MUST name your folders as follows:
» Rule: YYYY_MM_DD-[place]_[description]
» 4 digits for the year [YY]
» 2 digits for the month [MM]
» 2 digits for the day (optional) [DD]
» 2 words max description of the place
» 3 words max description of the event
» examples of efficient folder names:
»» 2009_10_23-grandma_family_trip
»» 2010_08_11-tonys_restaurant_dads_bday
Final Example
» My Pictures
» CARLY
» CHURCH
» 2011_05_10-mandalay_park_picnic
» 2012_07_04-beach_july_4th
» FAMILY
» 2009
» 2010
» 2011
» 2011_01_15-grandma_family_trip
» 2011_02_18-tonys_restaurant_dads_bday
» 2011_04-yosemite_park_family_trip
» 2012
» 2012_01_01-smiths_new_years_party
» FRIENDS
Setting Up Folders
When you are organizing your pictures, you will first need to create a set of folders, using the logic described above. This is very easy in Windows 7. First you need to open up your "My Pictures" folder.
Click on Windows Explorer


You can find this by left-clicking on the ">" in front of the "Pictures" folder in Windows Explorer to show the folders under it (i.e., included in it).


These will be "My Pictures" and "Public Pictures".
Then left-click on "My Pictures" to open up this folder. This will show all the pictures and folders already in this folder.

You can add new folders in the "My Pictures" folder by left-clicking on "New Folder" in the tool bar (above the pictures). A new folder will appear on the screen with the title "New Folder" highlighted. Just begin typing the desired title for this folder (no need to put the cursor in the box) and the push the "Enter" key on the keyboard to title this new folder appropriately. Continue adding as many folders as needed. You can double-click on any folder to open it up and then add new folders in that folder. This is the way to build up a system of folders as described in the above section. Please note that empty folders were added for “Dogs” and “Drives”
Moving or Copying Files
Once you set up a system of folders, you will need to move pictures already in your "My Pictures" folder or in other less useful folders (such as folders labeled only with a date) into folders appropriately titled. There are several ways to do this but the safest way is the "right-click" method. Find the picture you want to move and right-click on it. This will bring up a menu that includes, among other things, "Cut" and "Copy". If you left-click on "Cut" it will move the picture into the Clipboard (a temporary storage device in Windows). If you left-click on "Copy", it copies the picture into the Clipboard, leaving a copy of the picture behind. Choose the one that works best for you, but remember that always using "Copy" will clutter your folders.


Then move the pointer over the folder you want to move the picture to. Then right-click on that folder
A menu will come up that includes "Paste", among other things.
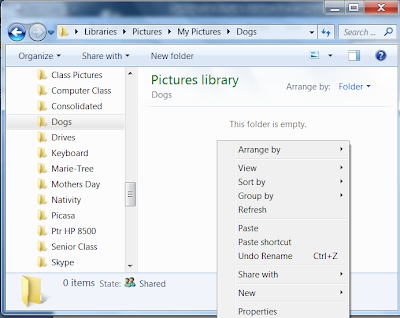

Left-click on "Paste", and that will move the picture from the Clipboard into the folder.
You can move or copy a contiguous group of pictures all at the same time by first "selecting" them all before performing the move or copy as described above.
To "select" them, find the first picture in the contiguous group and left-click on it. Then hold the "ctrl" key down and click on and highlight all the pictures you want to move or copy. You can go down several rows if needed. You will see the highlighting progress as you proceed. Be sure to hold the "ctrl" key down until you finish the "Selecting" process. Then release the "ctrl" key and proceed with the cut or copy process, using the "right-click" method described above. If you wish to un-select the pictures, just left-click on any blank space in the folder.
Continue doing this until all your pictures are properly located. This will probably result in some folders that are no longer needed, since they are not usefully titled. It is best to delete the folders to simplify your system of picture management. If they contain copies of pictures that are in appropriately titled folders, these picture copies can be deleted along with the unneeded folders.
STEP 5: Be consistent!
Now, use the same techniques every time you transfer more pictures from your camera to your computer. However, it is very important that you remain consistent every time you transfer new pictures to your computer. If you become lazy again, you will have to go through the same process later on. However, it will take more time because you will not remember what has been organized and what hasn’t.
STEP 5: Be consistent!
You MUST use the same rules every time:
» you download new pictures from your camera
» you download new pictures from the web
» you download new pictures from emails
Congratulations! You have just organized your pictures in 5 easy steps…wasn’t that cool 
Downloading from Your Digital Camera to your Computer:
1. Set your computer to the Desktop.
2. Attach the camera to the PC with the USB wire.
3. Turn on the Camera and wait for the Action window.
4. Double click the Photo Gallery Icon to import.
Option 1 - Import all New pictures only:
A. Type the Name for the desired folder. (May be an existing one).
B. Click Import.
C. Photo Gallery will open with the imported pictures placed.
Option 2 – Review, Organize and Group to Import pictures:
A. Click Next.
B. Select (Highlight) the pictures to import.
C. Click on the little Folder shown and type the Name for the desired folder. (May be an existing one).
You can type the same folder name for each group or a different name to place pictures in a new folder.
D. Click Import.
E. Photo Gallery will open with the imported pictures to the Folders chosen.
Downloading from your E-Mail with a picture attached:
When using Google Chrome:
Next to the picture, click on Download.
In the lower left corner, click on the Photo Gallery Icon.
In the upper left corner double click the Photo Gallery Icon to Edit, Organize to open Photo Gallery.
You can now Drag and Drop the picture from the Download folder to an existing picture folder or create a new folder with a new name where you can place the picture.
In the lower left corner, click on the Photo Gallery Icon.
In the upper left corner double click the Photo Gallery Icon to Edit, Organize to open Photo Gallery.
You can now Drag and Drop the picture from the Download folder to an existing picture folder or create a new folder with a new name where you can place the picture.
To drag and drop, place the arrow on the picture and press and hold the left button of the mouse. Slide the mouse over to the folder desired and when it highlights, release the button.
Downloading from your E-Mail with a picture attached:
When using Internet Explorer
Next to the picture, click on Download. Click on the Save box.
In the left Panel under Libraries, select Pictures, My Pictures and the folder you
want to save the picture in. You can also create a new folder with a new name where
you can place the picture. To make a new folder, click the right button of the mouse.
Slide down to New and select Folder. When it is highlighted, you can type the name
of the new folder.
Click on Save.
Click on Open and the Allow to View the saved picture. Remember where you saved it so you will be able to find it later.
In the left Panel under Libraries, select Pictures, My Pictures and the folder you
want to save the picture in. You can also create a new folder with a new name where
you can place the picture. To make a new folder, click the right button of the mouse.
Slide down to New and select Folder. When it is highlighted, you can type the name
of the new folder.
Click on Save.
Click on Open and the Allow to View the saved picture. Remember where you saved it so you will be able to find it later.
How to Save an Embedded Picture in an Email:
The following steps can be used to save a picture that is embedded in an email that you receive with any email program, such as GMail, Yahoo Mail or Hotmail.
Steps:
1. Make sure you know the folder name that you save the picture(s) to. This can be your “My Pictures” folder if you don’t have many pictures, or a specific titled folder in your “My Pictures” folder. If you need a new folder for this, do the following: Go to your “My Pictures” folder and click on “New folder” in the tool bar right above the white space. A new folder will appear in the white space with a title “New folder” that is highlighted (blued over). Begin typing the title you actually want this folder to have, that is appropriate for the type of picture you want to save (e.g., “Grandchildren”), and when you have finished typing, hit “Enter”. You will see that you have created a new folder that has the appropriate title. You may now close the folder.
2. Go to your email program and open the email that contains the picture you wish to save. Put the mouse pointer (it will actually change to a hand with a finger pointing) in the center of the picture and right-click the mouse. A menu will come up. One of the items in the menu will be “Save Picture As…”. Left-click this line. Then a “Save Picture” panel will come up which will have your “My Pictures” folder in it. If you want to save it there, go to the next step. If you have a special folder to save the picture in, find it and double-click (left) on it to open it up.
3. There is a “File Name” box under the folder(s). It will already have a title in it which will not be the one you want. You should replace it with a unique title that fits the subject of the picture. Each picture in a folder must have a unique title. To replace the existing title, just left-click on the existing tile to highlight it , and then type in the title you want. Then left-click on the “Save” button right beside the title box.
4. Go to the “My Pictures” folder and open the folder you saved the picture to. It should be there.
5. Continue saving each picture that you wish to save by using the same steps. Be sure to have an appropriate folder for the picture and a unique title for each picture. If you have several pictures with the same subject (e.g., several pictures of “Bob”), then you can put a different number after the name (e.g., Bob1, Bob2, Bob3) or a date or any other unique description.
6. After you’ve saved the pictures from an email, you can delete the email.


